Wednesday, May 1, 2024

How to Install Oracle Database in Docker: Step-by-Step Guide for Seamless Deployment

In this post, we will go through the steps on how we can install and use Oracle Database 21c inside an Docker container. To access the database image on Docker, you start the container and then run the commands through docker to access the database 
Oracle Database on Docker
Steps:-

[opc@instance-20240128-1525 ~]$ sudo yum install docker-engine docker-cli


[opc@instance-20240128-1525 ~]$ sudo systemctl enable --now docker


[opc@instance-20240128-1525 ~]$ sudo docker info

Client:

 Debug Mode: false


Server:

 Containers: 0

  Running: 0

  Paused: 0

  Stopped: 0

 Images: 0

 Server Version: 19.03.11-ol

 Storage Driver: overlay2

  Backing Filesystem: xfs

  Supports d_type: true

  Native Overlay Diff: false

 Logging Driver: json-file

 Cgroup Driver: cgroupfs

 Plugins:

  Volume: local

  Network: bridge host ipvlan macvlan null overlay

  Log: awslogs fluentd gcplogs gelf journald json-file local logentries splunk syslog

 Swarm: inactive

 Runtimes: runc

 Default Runtime: runc

 Init Binary: docker-init

 containerd version: 7eba5930496d9bbe375fdf71603e610ad737d2b2

 runc version: 860f061

 init version: fec3683

 Security Options:

  seccomp

   Profile: default

 Kernel Version: 5.4.17-2136.322.6.2.el7uek.x86_64

 Operating System: Oracle Linux Server 7.9

 OSType: linux

 Architecture: x86_64

 CPUs: 2

 Total Memory: 6.487GiB

 Name: instance-20240128-1525

 ID: 6OVG:2ZU5:3GU5:AJKF:JAKN:FJSU:SJ2Q:D7ZM:ZNKN:EJKS:6T3M:3GJ6

 Docker Root Dir: /var/lib/docker

 Debug Mode: false

 Registry: https://index.docker.io/v1/

 Labels:

 Experimental: false

 Insecure Registries:

  127.0.0.0/8

 Live Restore Enabled: false


Registries:


[opc@instance-20240128-1525 ~]$ sudo su

[root@instance-20240128-1525 opc]# docker login container-registry.oracle.com

Username: *********

Password:

WARNING! Your password will be stored unencrypted in /root/.docker/config.json.

Configure a credential helper to remove this warning. See

https://docs.docker.com/engine/reference/commandline/login/#credentials-store


Login Succeeded

[root@instance-20240128-1525 opc]# docker pull container-registry.oracle.com/database/enterprise:latest


[root@instance-20240128-1525 opc]# docker ps

CONTAINER ID        IMAGE                                                      COMMAND                  CREATED             STATUS                            PORTS                    NAMES

e556dbeb3c1d        container-registry.oracle.com/database/enterprise:latest   "/bin/sh -c 'exec $O…"   5 seconds ago       Up 4 seconds (health: starting)   0.0.0.0:1521->1521/tcp   oracle-db


Check the logs


[root@instance-20240128-1525 opc]# docker logs oracle-db

From the log, we can after few mins, we can see a message like below.


The Oracle base remains unchanged with value /opt/oracle

#########################

DATABASE IS READY TO USE!

#########################


Now, go inside the docker container.


[root@instance-20240128-1525 opc]# docker ps -a

CONTAINER ID        IMAGE                                                      COMMAND                  CREATED             STATUS                       PORTS                    NAMES

e556dbeb3c1d        container-registry.oracle.com/database/enterprise:latest   "/bin/sh -c 'exec $O…"   2 hours ago         Up About an hour (healthy)   0.0.0.0:1521->1521/tcp   oracle-db

[root@instance-20240128-1525 opc]# docker exec -it oracle-db /bin/bash


bash-4.2$ whoami

oracle

bash-4.2$ sqlplus / as sysdba


SQL*Plus: Release 21.0.0.0.0 - Production on Sun Jan 28 12:27:14 2024

Version 21.3.0.0.0


Copyright (c) 1982, 2021, Oracle.  All rights reserved.


Connected to:

Oracle Database 21c Enterprise Edition Release 21.0.0.0.0 - Production

Version 21.3.0.0.0


SQL> show pdbs;


    CON_ID CON_NAME                       OPEN MODE  RESTRICTED

---------- ------------------------------ ---------- ----------

         2 PDB$SEED                       READ ONLY  NO

         3 ORCLPDB1                       READ WRITE NO


bash-4.2$ df -kh

Filesystem      Size  Used Avail Use% Mounted on

overlay          39G   19G   21G  48% /

tmpfs            64M     0   64M   0% /dev

tmpfs           3.3G     0  3.3G   0% /sys/fs/cgroup

shm              64M     0   64M   0% /dev/shm

/dev/sda3        39G   19G   21G  48% /etc/hosts

tmpfs           3.3G     0  3.3G   0% /proc/acpi

tmpfs           3.3G     0  3.3G   0% /proc/scsi

tmpfs           3.3G     0  3.3G   0% /sys/firmware


how to connect to the db using sqldeveloper


sqldeveloper connection


Hostname is the public IP of the VM where the container is running.


This completes the step by step instructions on how we can install Oracle DB inside a docker container and subsequently connect to the DB using sqldeveloper client. I hope, this post will help someone. 

Till then, start learning cloud. 


Thursday, April 25, 2024

Mastering Oracle Cloud: Step-by-Step Guide to Provision Your OIC Instance

 Oracle Integration Cloud Service is a complete, secure, but lightweight integration solution that enables you to connect your applications in the cloud. It simplifies connectivity between your applications, and can connect both your applications that live in the cloud and your applications that still live on premises. It is a PaaS offering from Oracle and thus users who needs access to access to OIC must reside in IDCS(which is now the identity domain). In this post, we are going to explain, how we can provision an OIC instance from scratch when we have identity domain in place.

OIC


We will now provision an OIC instance in OCI console. Go to Developer Services


Click on Integration


We have successfully provisioned OIC instance. Now, in order to login, we need a user which has to be validated by IAM(Identity Domains) and it should have proper role assigned to it.

Go to Identity Domains, select the required domain and create a new user


Once the user is created, go to the Oracle Cloud Services under Identity domains and choose the OIC instance which was created earlier.


Click on the name and navigate to "Application roles".


Click on Assign.

That's it. Using this user, we should be able to login to the OIC Console.

OIC Home page


I hope this post will help someone. Till, then keep learning cloud.

Tuesday, April 23, 2024

Strengthen Your Cloud Security: Exploring OCI Vulnerability Scanning Services

  In Oracle Cloud Infrastructure (OCI), vulnerability scanning services are offered to help ensure the security of your infrastructure. The OCI vulnerability scanning service is designed to scan virtual cloud networks (VCNs) and identify vulnerabilities in the cloud infrastructure

OCI Vulnerability Scanning Services

In this post, we are going to explain, once a CVE is detected, then what is the approach we can take to mitigate those CVE risks. But before we do so, i would suggest we go through the official Oracle Documentations VSS.

You can access the vulnerability scanning service in OCI through the OCI console. Here's a brief guide on how to do it:

Log in to the OCI Console.
Open the "Security" menu.
Click on "Security Advisor".
Navigate to "Vulnerability Scanning".

Now, let us go through the remediation steps. You might get the CVEs as listed below


If we click on "View Details", we might see the below information for cause and remediation.


The errata details can be found in the link which is considered to be as the database for CVEs.


Server was already having the version 4.5.0-36.el7_9.5

 Command to check:

rpm -qa|grep libvirt


Thus, we came to conclusion that the CVEs are being reported for the existing package which is there in the server and in order to mitigate them, we need to upgrade the version to 5.

Steps:

Steps:-

1.       cd /etc/yum.repos.d

2.       took the backup of file public-yum-ol7.repo

3.       took the backup of boot volume

4.       in the file public-yum-ol7.repo, enabled the flag as 1 for section


y    yum update

1.       Reboot the server

2.       Disable and enable VSS

3.       Verify the Scanning report

4.       Check with the application team for sanity before moving it to next higher instances

y

These are the many ways through which we can mitigate the CVEs being reported by VSS in OCI. I hope this post will help someone. Till then, happy learning cloud.


Monday, April 8, 2024

Cross-Platform Efficiency: Mastering Federation of Azure AD with OCI Identity Domains for SSO Solution

 By federating Azure AD with OCI Identity domains(more on OCI Identity Domains), businesses can centralize user authentication, simplifying access management and reducing administrative overhead. This robust integration enables a single sign-on (SSO) experience, allowing users to securely access resources across both platforms with a single set of credentials. With enhanced security measures and simplified user provisioning, organizations can ensure compliance with regulatory standards while fostering a seamless user experience. Now, with all new tenancies, Oracle has introduced identity domains as a single domain for storing all the users, groups credentials and so the navigations have also changed a bit. Also, the point to be noted that in the background, it is the same IDCS solution running.

SSO between OCI and Azure


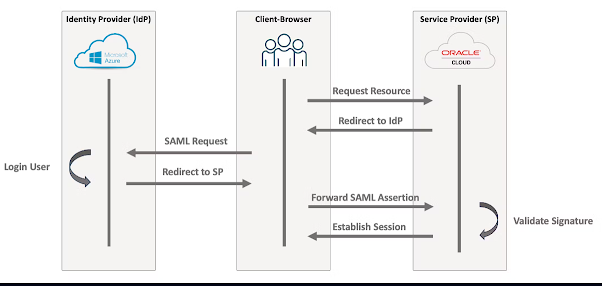
Here, OCI act as a service provider (SP) and Microsoft Azure act as an Identity Provider (IdP). The Service Provider (OCI) creates a SAML request and forwards the user and the SAML request to the Identity Provider (Azure AD). Once the user is authenticated, the IdP sends back a SAML response with an assertion to the Service Provider's Assertion Consumer Service endpoint. 

Note: Azure AD  is now Microsoft Entra ID.


Go to the OCI Hamburger menu > Identity and Security


Click on Domains and change the below settings first


get the IDCS url


Copy the IDCS url and add /fed/v1/metadata. Open a browser and save the file as XML.

On the Azure Portal now:-

Create an Enterprise Application. Choose the option as Oracle


Choose the option Oracle Cloud Infrastructure Console


Give it a name and Click on Create


Click on Single Sign on and choose the option for SAML


Upload the OCI downloaded metadata xml file


Download the Federation Metadata XML which has to be uploaded to OCI side.

OCI Side:-


Click on Add SAML IdP


Choose the option Upload metadata xml file


Upload the xml file downloaded from Azure Portal


Review and Create


Test the login


Activate the IdP


Edit the IdP policies and add Azure AD


Test the setup.

Note: User has to be present on both OCI IAM and Azure AD

Login to the OCI console and we will get the IdP icon


Click on Azure AD


oci login after federation


Here we are. We have successfully landed to the OCI home page.

This post explains about the integration of Oracle cloud Infrastructure Identity domains with Microsoft Azure AD for a seamless Single Sign on Solution.

I hope, this post will help someone. Till then, enjoy learning cloud.

References:-https://docs.oracle.com/en-us/iaas/Content/Identity/Concepts/federation.htm#top
https://docs.oracle.com/en-us/iaas/Content/Identity/tutorials/azure_ad/lifecycle_azure/02-config-azure-iam-template.htm#config-azure-iam-template

Thursday, April 4, 2024

Secure Your Network: Private DNS in Oracle Cloud Infrastructure

 Private DNS in Oracle Cloud Infrastructure (OCI) refers to a service that enables you to create and manage custom domain names within your virtual cloud network (VCN). With Private DNS, you can define custom domain names and map them to specific resources, such as Compute instances, Load Balancers, or other services within your VCN.

Key features and benefits of Private DNS in OCI include:
Custom Domain Names: You can create your own domain names, such as example.com or subdomain.example.com, tailored to your organization's needs.
Resource Mapping: Private DNS allows you to map these custom domain names to specific resources within your VCN, making it easier to manage and access your services.
Network Isolation: By using Private DNS within your VCN, you can ensure that your domain names remain private and are only accessible within your network, enhancing security and control.
Integration with Oracle Services: Private DNS seamlessly integrates with other Oracle Cloud services, enabling you to easily manage domain names for resources such as Compute instances, Load Balancers, and more.
Automation and Scalability: You can automate the creation and management of domain names using OCI's APIs, CLI, or Terraform, making it easy to scale and manage your infrastructure.
Overall, Private DNS in OCI provides a flexible and secure way to manage domain names and map them to resources within your virtual cloud network, facilitating efficient communication and management of your cloud infrastructure.
Now, the objective of this post is to give an idea on how we can communicate to the resources using their hostnames. As we know, DNS is a feature which translates hostnames to IP addresses. If we have resources in OCI and they don't know the respective hostnames, then the communication can't be established. To mitigate this problem, OCI has the option of Private DNS in OCI.
A small use case here.
When we provision a compute instance, it comes with its own fully qualified domain name example oraclevcn.com. Now, if i need to set it to samappsdba.com, we need to perform some additional steps.
The high level steps
Private DNS Zone – which contain DNS data from the VCN (like IP address)
Private DNS Views – this is collection of Zones, Zone can only belong to a single View.
Private DNS Resolver – you can assign Views to Resolver which will then resolve those DNS queries for you. Remember the order, first custom views, then default and finally from Internet


Once the A record is added and published, we can do the test


[opc@instance-20240328-1959 ~]$ host -t NS samapspdba.com

samapspdba.com name server vcn-dns.oraclevcn.com.

[opc@instance-20240328-1959 ~]$


After I delete it the private view


@instance-20240328-1959 ~]$ host -t NS samapspdba.com

samapspdba.com name server vcn-dns.oraclevcn.com.

[opc@instance-20240328-1959 ~]$ nslookup www.samapspdba.com

Server:         169.254.169.254

Address:        169.254.169.254#53


** server can't find www.samapspdba.com: REFUSED


This is a basic demonstration on how using private DNS feature in OCI, we can customize the hostname. 

I hope this post helps someone.


Tuesday, March 26, 2024

Read only access to OCI Console.

 If you need read-only access to the Oracle Cloud Infrastructure (OCI) Console, you can achieve this by creating a policy within OCI Identity and Access Management (IAM) that grants only the necessary read permissions to the resources you want to access. The below steps are applicable to identity domains only. To read more about identity domains identity domains in OCI


Here's a general outline of how you might set this up:

1. Create a User

2. Create a group and assign the above created user to group

3. Create a policy in root compartment

Verb:- allow group group_name to read all-resources in tenancy

Note:-Note* Please keep in mind that even though the above users created have only “Read-only” access, they will be able to click certain options such as “create, edit, reboot, terminate, etc”, however, they won’t be able to execute any of these options

Hope this post help someone