Thursday, March 30, 2017

Not able to start EBS 12.1.3 services:[ons-secure] Failed to open wallet

Today i faced a strange issue where i was working in one of our cloned instance-EBS 12.1.3 and while starting the apps tier, i got the below error.

You are running adopmnctl.sh version 120.6.12010000.5

Checking status of OPMN managed processes...
Unable to connect to opmn.
Opmn may not be up.

adopmnctl.sh: exiting with status 0

adopmnctl.sh: check the logfile


if we get the above errors, we should check the OPMN logs and the logs were showing the error:

(file:$INST_TOP/certs/opmn) [default password]: 28759
15/11/15 15:01:28 [ons-secure] Failed to open wallet

Thus i come down to a conclusion that there is something wrong with my wallet files. I navigated to the directory and found that the files are there at the appropriate location $INST_TOP/certs/opmn and $INST_TOP/certs/Apache

Note:If the files are missing in the above directory then we need to copy the same from  "APPS Mount/tech_st/10.1.3/opmn/conf/ssl.wlt/default to $INST_TOP/certs/opmn and $INST_TOP/certs/Apache.


Now in my case my files were in the directory, then why the error was coming. I remember that to renew our SSL certifcates which was SHA-2, i had to patch 10.1.3 Oracle HOME with minimum CPU OCT 2015 patch(21845960). As in EBS 12.1.3, we don't refresh $INST_TOP, so the existing wallets files were expecting that the binaries of 10.1.3 OH should be compatible with SHA-2 algorithm. During refresh from our PROD instance, the 10.1.3 OH which got drilled down to cloned instance, in that the binaries were only compatible with SHA-1 algorithm. I suspect that because of this incompatibility my wallet files were not able to be detected.

So to resolve the issue, i had to patch the 10.1.3 OH again(minimum CPU OCT 2015 patch(21845960)) and the issue got resolved. I was able to start all the services with ease and login page certs started using new certs SHA-2. Hope it helps.


Thursday, March 2, 2017

Oracle Database 12c Release 2 is here!!!!!!!!

Well, we all are aware that Oracle 12c release 2 is in the market. It is now available for download in OTN and edelivery sites.


Download link  OTN Link


Some of the new features in 12C RELEASE 2 are

1. Lock inactive account automatically after specified number of days. 

Addition of new INACTIVE_ACCOUNT_TIME parameter resource parameter under dba_profiles.

 By default, it is set to UNLIMITED.
 The minimum setting is 15 and the maximum is 24855.


SQL> select RESOURCE_NAME,limit from dba_profiles where profile='DEFAULT';

RESOURCE_NAME                               LIMIT
------------------------------------------- -----------------------
COMPOSITE_LIMIT                             UNLIMITED
SESSIONS_PER_USER                           UNLIMITED
CPU_PER_SESSION                             UNLIMITED
CPU_PER_CALL                                UNLIMITED
LOGICAL_READS_PER_SESSION                   UNLIMITED
LOGICAL_READS_PER_CALL                      UNLIMITED
IDLE_TIME                                   UNLIMITED
CONNECT_TIME                                UNLIMITED
PRIVATE_SGA                                 UNLIMITED
FAILED_LOGIN_ATTEMPTS                       10
PASSWORD_LIFE_TIME                          180
PASSWORD_REUSE_TIME                         UNLIMITED
PASSWORD_REUSE_MAX                          UNLIMITED
PASSWORD_VERIFY_FUNCTION                    NULL
PASSWORD_LOCK_TIME                          1
PASSWORD_GRACE_TIME                         7
INACTIVE_ACCOUNT_TIME                       UNLIMITED ----------- > This is the resource_name introduced in oracle 12.2.

17 rows selected.

To make an account lock automatically after 30 days of inactivity, Create a profile by setting INACTIVE_ACCOUNT_TIME to 30 and Set the profile to that user.


   CREATE PROFILE "TEST"
    LIMIT
         COMPOSITE_LIMIT UNLIMITED
         SESSIONS_PER_USER UNLIMITED
         CPU_PER_SESSION UNLIMITED
         CPU_PER_CALL UNLIMITED
         LOGICAL_READS_PER_SESSION UNLIMITED
         LOGICAL_READS_PER_CALL UNLIMITED
         IDLE_TIME UNLIMITED
         CONNECT_TIME UNLIMITED
         PRIVATE_SGA UNLIMITED
         FAILED_LOGIN_ATTEMPTS 10
         PASSWORD_LIFE_TIME 15552000/86400
         PASSWORD_REUSE_TIME UNLIMITED
         PASSWORD_REUSE_MAX UNLIMITED
         PASSWORD_VERIFY_FUNCTION NULL
         PASSWORD_LOCK_TIME 86400/86400
         PASSWORD_GRACE_TIME 604800/86400
         INACTIVE_ACCOUNT_TIME 30;

SQL>  select RESOURCE_NAME,limit from dba_profiles where profile='TEST' and resource_name='INACTIVE_ACCOUNT_TIME';

RESOURCE_NAME                               LIMIT
------------------------------------------- -----------------------
INACTIVE_ACCOUNT_TIME                       30

SQL> CREATE USER testuser identified by testuser profile TEST;

User created.


2.Spool CSV in Oracle 12.2

Before this release we used to get the spool in txt or html format using SET MARKUP. But with this release, we can get the spool in .csv format.
Below is the snippet.

SQL> SET MARKUP CSV ON QUOTE OFF
SQL> SET MARKUP CSV ON DELIMITER |
SQL> select * from DBA_USERS where rownum < 10;


3. SQLPLUS history 

In this release, sqlplus can keep the history and it has to be enabled manually. Below is the snippet

SQL> set history on

SQL> select * from v$database;

NAME
———
SAM


SQL> history
1 select name from v$database;


SQL> exit

You can run “show hist” to be sure that the history is enabled:


SQL> SHOW HIST
history is ON and set to “100”

You can delete all history by running “hist clear”:

SQL>  HIST CLEAR
SQL>  HIST
SP2-1651: History list is empty.

The following example shows you how to enable or disable command history, and how to check the command history status:

SQL> set history on

SQL> show history
History is ON and set to “100”

SQL> set history off

SQL> show history
History is OFF

— To keep history of 2000 sql command.


SQL> set history 2000

SQL> show history
History is ON and set to "2000"


4. Parfile contents can be seen the expdp/impdp log file. Another change is introduction of parallel option for metadata using expdp/impdp


Tuesday, February 7, 2017

Importance of LAST_CALL_ET column in V$session view

Well, we all know the importance of v$session view in oracle. We often look for status,sid,sql_text,program name and other object related things in this table. However there is also one important column inside it which we often tend to ignore which is LAST_CALL_ET(pointed by Connor Mcdonald in his blog-https://connormcdonald.wordpress.com/2016/04/13/active-and-inactive-sessions)


From his blog:

If the session STATUS is currently ACTIVE, then the value represents the elapsed time (in seconds) since the session has become active.

If the session STATUS is currently INACTIVE, then the value represents the elapsed time (in seconds) since the session has become inactive.


Thus this is a great column to get a view on what sessions are doing on your system, for example


select s.sid||','||s.serial# sess,
       s.USERNAME,
       s.last_call_et,
       s.status,
       s.sql_address,
       s.program
from v$session s
where ( s.status = 'ACTIVE' and s.last_call_et > 10 ) or      -- has been active for 10 seconds or more
      ( s.status != 'ACTIVE' and s.last_call_et > 1200 );     -- has been inactive for 20 mins or more


Sunday, February 5, 2017

Java VisualVM comes by default with EBS 12.2

Java VisualVM is a tool that provides a visual interface for viewing detailed information about Java applications while they are running on a Java Virtual Machine (JVM), and for troubleshooting and profiling these applications. Basically it helps in troubleshooting applications on top of Java. We can see how much CPU the applications are using and the server getting used etc.

More details can be found in -http://docs.oracle.com/javase/7/docs/technotes/guides/visualvm/

Before EBS 12.2, we have to download them separately but with EBS 12.2 it comes by default.
Path-$COMMON_TOP/util/jdk64/bin/jvisualvm


Saturday, February 4, 2017

EBS 12.2.6 - 12C DB installation on Linux

This is a fresh install of EBS 12.2.6 in Linux machine using latest startCD 51. There are considerable changes done in this release and the details can be found in my previous posts.

Lets get started:

Oracle E-Business Suite Installation and Upgrade Notes Release 12 (12.2) for Linux x86-64 (Doc ID 1330701.1)

1. Installation of Linux

2. Installing rpms for EBS 12.2 and RDBMS 12C

3. Check all rpms

rpm -qa --qf "%{n}-%{v}-%{r}.%{arch}\n" | grep openmotif21

4. Run ldconfig –v command to relink all symbolic libraries

5. Disable selinux and shutdown iptables,ip6tables services also on run levels

vi /etc/selinux/config ( change SELINUX=enforcing to SELINUX=disabled )

service iptables stop

service ip6tables stop

chkconfig --level 0123456 ip6tables off

chkconfig --level 0123456 iptables off

6. Check kernel settings for the parameters are correctly set

Note: If the current value for any parameter is higher than the value listed in the following table, then do not change the value of that parameter.

vi /etc/sysctl.conf

kernel.semmsl 256

kernel.semmns 32000

kernel.semopm 100

kernel.semmni 142

kernel.shmall 20971524

kernel.shmmax Half the size of the physical memory (in bytes), and at least 42949672952

kernel.shmmni 4096

kernel.msgmax 8192

kernel.msgmnb 65535

kernel.msgmni 2878

fs.file-max 6815744

fs.aio-max-nr 1048576

net.ipv4.ip_local_port_range 9000 65500

net.ipv4.tcp_tw_recycle 05

net.core.rmem_default 262144

net.core.rmem_max 4194304

net.core.wmem_default 262144

net.core.wmem_max 1048576

Note : Parameter kernel.sem = 250 32000 100 128 is changed to kernel.sem = 250 32000 100 142

7. Check Domain Name System (DNS) Resolver Parameters , it should be below

options attempts:5
options timeout:15

8. Verifying Host Names

· Verify that the /etc/hosts file is formatted as follows:

127.0.0.1 localhost.localdomain localhost
[ip_address] [node_name].[domain_name] [node_name]

· Verify that the /etc/sysconfig/network file is formatted as follows:
HOSTNAME=[node_name].[domain_name]
or as follows:
HOSTNAME=[node_name]
NISDOMAIN=[domain_name]
· If the /etc/sysconfig/networking/profiles/default/network file exists, remove it.

· If you changed any files in the previous steps, restart the system

9. Modify ulimit settings in limits.conf
vi /etc/security/limits.conf

# oracle-rdbms-server-11gR2-preinstall setting for nofile soft limit is 1024
oracle soft nofile 4096
# oracle-rdbms-server-11gR2-preinstall setting for nofile hard limit is 65536
oracle hard nofile 65536
# oracle-rdbms-server-11gR2-preinstall setting for nproc soft limit is 2047
oracle soft nproc 2047
# oracle-rdbms-server-11gR2-preinstall setting for nproc hard limit is 16384
oracle hard nproc 16384
# oracle-rdbms-server-11gR2-preinstall setting for stack soft limit is 10240KB
oracle soft stack 10240
# oracle-rdbms-server-11gR2-preinstall setting for stack hard limit is 32768KB
oracle hard stack 32768 

R12.2: How To Create the Stage In Preparation For Installation (Doc ID 1596433.1)


Check the version of existing version of start CD:

[root@ebs1 rapidwiz]# ./RapidWizVersion


Oracle E-Business Suite Rapid Install Wizard

Version 12.2.0.51

(c) Copyright 2000-2011 Oracle Corporation.  All rights reserved.


[root@ebs1 rapidwiz]#


Build the stage
[root@ebs1 bin]# sh buildStage.sh


                     Copyright (c) 2002, 2013 Oracle Corporation
                        Redwood Shores, California, USA

                       Oracle E-Business Suite Rapid Install

                                 Version 12.2.0


Press Enter to continue...

                      Build Stage Menu

   ------------------------------------------------------

   1.     Create new stage area

   2.     Copy patches to existing stage area

   3.     List files in TechPatches directory

   4.     Exit menu


   Enter your choice [4]: 1

            Rapid Install Platform Menu

   ------------------------------------------------------

   1.    Oracle Solaris SPARC (64-bit)

   2.    Linux x86 (64-bit)

   3.    IBM AIX on Power Systems (64-bit)

   4.    HP-UX Itanium

   5.    Exit Menu


   Enter your choice [5]: 2

Running command:

/u01/stage/startCD/Disk1/rapidwiz/bin/../jre/Linux_x64/1.6.0/bin/java -classpath /u01/stage/startCD/Disk1/rapidwiz/bin/../jlib/emocmutl.jar:/u01/stage/startCD/Disk1/rapidwiz/bin/../jlib/ewt-3_4_22.jar:/u01/stage/startCD/Disk1/rapidwiz/bin/../jlib/share-1_1_18.jar:/u01/stage/startCD/Disk1/rapidwiz/bin/../jlib/jnls.jar:/u01/stage/startCD/Disk1/rapidwiz/bin/../jlib/ACC.JAR:/u01/stage/startCD/Disk1/rapidwiz/bin/../jlib/netcfg.jar:/u01/stage/startCD/Disk1/rapidwiz/bin/../jlib/ojdbc14.jar:/u01/stage/startCD/Disk1/rapidwiz/bin/../jlib/OraInstaller.jar:/u01/stage/startCD/Disk1/rapidwiz/bin/../jlib/java oracle.apps.ad.rapidwiz.util.StageBuilder /u01/stage/startCD/Disk1/rapidwiz/bin Linux_x64 Linux_x64


Specify the directory containing the zipped installation media:
/u01/stage


File list:
/u01/stage/startCD/Disk1/rapidwiz/bin/stageData/zipFiles.dat
The set of zip files is complete.
Unzip command is: /u01/stage/startCD/Disk1/rapidwiz/unzip/Linux_x64/unzip -o

Press Enter to continue...
Archive:  /u01/stage/startCD/Disk1/rapidwiz/bin/stageData/epdFiles/epdLinux_x64.zip
 extracting: /u01/stage/startCD/Disk1/rapidwiz/bin/../../../../TechPatches/../TechPatches/MiddleTier/14272383/p14272383_1036_Generic.zip
 extracting: /u01/stage/startCD/Disk1/rapidwiz/bin/../../../../TechPatches/../TechPatches/MiddleTier/20484781/p20484781_111190_Generic.zip
 extracting: /u01/stage/startCD/Disk1/rapidwiz/bin/../../../../TechPatches/../TechPatches/MiddleTier/14577216/p14577216_101231_Generic.zip
 extracting: /u01/stage/startCD/Disk1/rapidwiz/bin/../../../../TechPatches/../TechPatches/MiddleTier/16241466/p16241466_10123_LINUX.zip

                     Build Stage Menu

   ------------------------------------------------------

   1.     Create new stage area

   2.     Copy patches to existing stage area

   3.     List files in TechPatches directory

   4.     Exit menu


   Enter your choice [4]: 2

         Rapid Install Platform Menu

   ------------------------------------------------------

   1.    Oracle Solaris SPARC (64-bit)

   2.    Linux x86 (64-bit)

   3.    IBM AIX on Power Systems (64-bit)

   4.    HP-UX Itanium

   5.    Exit Menu


   Enter your choice [5]: 2

Directory /u01/stage/TechPatches


Stage Builder will now stage the one-off patches for Linux_x64...

Press Enter to continue...
Archive:  /u01/stage/startCD/Disk1/rapidwiz/bin/../Xpatches/Linux_x64.zip

Finished copying additional patches.

Press Enter to continue...

                      Build Stage Menu

   ------------------------------------------------------

   1.     Create new stage area

   2.     Copy patches to existing stage area

   3.     List files in TechPatches directory

   4.     Exit menu


   Enter your choice [4]:4

Now, start the rapidwiz process.

cd /u01/stage/startCD/Disk1/rapidwiz


Now upgrade 12.2.0 to 12.2.6

Oracle E-Business Suite Release 12.2.6 Readme (Doc ID 2114016.1)


SQL> select * from v$version;

BANNER
--------------------------------------------------------------------------------
    CON_ID
----------
Oracle Database 12c Enterprise Edition Release 12.1.0.2.0 - 64bit Production
         0

PL/SQL Release 12.1.0.2.0 - Production
         0

CORE    12.1.0.2.0      Production
         0


BANNER
--------------------------------------------------------------------------------
    CON_ID
----------
TNS for Linux: Version 12.1.0.2.0 - Production
         0

NLSRTL Version 12.1.0.2.0 - Production
         0


SQL> select release_name from apps.fnd_product_groups;

RELEASE_NAME
--------------------------------------------------
12.2.0

[applmgr@ebs1 appl]$ . ./PROD_ebs1.env run
[applmgr@ebs1 appl]$ echo $FILE_EDITION
run
[applmgr@ebs1 appl]$ pwd
/u01/r12/application/fs1/EBSapps/appl
[applmgr@ebs1 appl]$


EBS Technology Codelevel Checker(ETCC)--Doc ID 1594274.1)

In the database tier
created one directory /u01/r12/database/12.1.0/appsutil/etcc

[oracle@ebs1 etcc]$ pwd
/u01/r12/database/12.1.0/appsutil/etcc
[oracle@ebs1 etcc]$ ./checkDBpatch.sh

 +===============================================================+
 |    Copyright (c) 2005, 2016 Oracle and/or its affiliates.     |
 |                     All rights reserved.                      |
 |             Oracle E-Business Suite Release 12.2              |
 |          Database EBS Technology Codelevel Checker            |
 +===============================================================+

Using context file from currently set database environment:
/u01/r12/database/12.1.0/appsutil/PROD_ebs1.xml

Starting Database EBS Technology Codelevel Checker, Version 120.40
Tue Jan 24 01:08:48 EST 2017
Log file for this session : ./checkDBpatch_20236.log

Bugfix XML file version: 120.0.12020000.33
This file will be used for identifying missing bugfixes.

Mapping XML file version: 120.0.12020000.6
This file will be used for mapping bugfixes to patches.


[WARNING] DB-ETCC: Bugfix XML file (./txk_R1220_DB_base_bugs.xml) in current directory is more than 30 days old.
 Check if a newer version is available in patch 17537119.

Identifying database release.
Database release set to 12.1.0.2.

Connecting to database.
PATCH RECOMMENDATION SUMMARY
===============================================================================
The default patch recommendations to install these missing bugfixes are:
-------------------------------------------------------------------------------
Oracle Database Release 12.1.0.2  (No PSU applied)
-------------------------------------------------------------------------------
  Patch 23595848
    - Filename: p23595848_121020_Linux-x86-64.zip

  Patch 18793246
    - Filename: p18793246_121020_Generic.zip

  Patch 23745950
    - Filename: p23745950_121020_Linux-x86-64.zip

  Patch 19591608
    - Filename: p19591608_121020_Linux-x86-64.zip

  Patch 19908836
    - Filename: p19908836_121020_Linux-x86-64.zip

  Patch 24481723
    - Filename: p24481723_121020_Linux-x86-64.zip

  Patch 22098146
    - Filename: p22098146_121020_Linux-x86-64.zip

  Patch 21286665
    - Filename: p21286665_121020_Linux-x86-64.zip

  Patch 21321429
    - Filename: p21321429_121020_Generic.zip

  Patch 21387964
    - Filename: p21387964_121020_Linux-x86-64.zip

  Patch 21864513
    - Filename: p21864513_121020_Linux-x86-64.zip

  Patch 21904072
    - Filename: p21904072_121020_Linux-x86-64.zip

  Patch 21967332
    - Filename: p21967332_121020_Linux-x86-64.zip

  Patch 22338374
    - Filename: p22338374_121020_Linux-x86-64.zip

  Patch 22496904
    - Filename: p22496904_121020_Linux-x86-64.zip

  Patch 22731026
    - Filename: p22731026_121020_Generic.zip

  Patch 23089357
    - Filename: p23089357_121020_Linux-x86-64.zip


Apply the required patches and rerun this script

You should check the patch READMEs for minimum opatch version requirements.
The latest opatch is available from My Oracle Support via Patch 6880880.


+-----------------------------------------------------------------------------+
A consolidated zip file with the required patches for Database Release
12.1.0.2.0 is available on My Oracle Support via:

  Patch 24658746 [12.1.0.2.0 version]
    - EBS RELEASE 12.2 CONSOLIDATED DATABASE FIXES FOR 161018 AND 160719

Note: This zip does not include any database bundle patches or PSUs.
+-----------------------------------------------------------------------------+

See Doc ID 1594274.1 for any special instructions for these patches.
Note: Footnotes in Doc ID 1594274.1 also apply to corresponding overlay patches.

Stored Technology Codelevel Checker results in the database PROD successfully.

Finished prerequisite patch testing : Tue Jan 24 01:10:06 EST 2017

Log file for this session: ./checkDBpatch_20236.log

===============================================================================

[applmgr@ebs1 patches]$ pwd
/u01/patches
[applmgr@ebs1 patches]$ sh checkMTpatch.sh

 +===============================================================+
 |    Copyright (c) 2005, 2016 Oracle and/or its affiliates.     |
 |                     All rights reserved.                      |
 |             Oracle E-Business Suite Release 12.2              |
 |           Middle Tier Technology Codelevel Checker            |
 +===============================================================+

Using context file from currently set applications environment:
/u01/r12/application/fs1/inst/apps/PROD_ebs1/appl/admin/PROD_ebs1.xml

Starting Middle Tier Technology Codelevel Checker, Version: 120.0.12020000.30.
Tue Jan 24 01:18:56 EST 2017
Log file for this session: /u01/patches/checkMTpatch_22029.log

Bugfix XML file version: 120.0.12020000.27
This file will be used for identifying missing bugfixes.

Mapping XML file version: 120.0.12020000.12
This file will be used for mapping bugfixes to patches.

Checking for prerequisite bugfixes in File Edition: run

Enter the password for the APPS user:
Connecting to database.
Database connection successful.
The installed AD.C codelevel does not support storing the results in the database.

===============================================================================
Oracle Forms and Reports
===============================================================================
Now examining product Oracle Forms and Reports.

Oracle Home = /u01/r12/application/fs1/EBSapps/10.1.2.
Product version = 10.1.2.3.0.
Checking required bugfixes for Oracle Forms and Reports 10.1.2.3.0.
  Missing Bugfix: 17353142  ->  Patch 22698265
  Missing Bugfix: 20643256  ->  Patch 22698265
  Missing Bugfix: 16041055  ->  Patch 22698265
  Missing Bugfix: 16910762  ->  Patch 22698265
  Missing Bugfix: 20270659  ->  Patch 22698265
  Missing Bugfix: 17372642  ->  Patch 22698265
  Missing Bugfix: 17566694  ->  Patch 22698265
  Missing Bugfix: 20240480  ->  Patch 22698265
  Missing Bugfix: 19304738  ->  Patch 22698265
  Missing Bugfix: 20391574  ->  Patch 22698265
  Missing Bugfix: 22351071  ->  Patch 22698265
  Missing Bugfix: 21024122  ->  Patch 22698265
  Missing Bugfix: 19588847  ->  Patch 22698265
The above list shows missing bugfixes for Oracle Forms and Reports.

Checking required bugfixes for RSF within Forms 10.1.0.5.0.
All required bugfixes are present for RSF within Forms.

===============================================================================
Oracle Fusion Middleware (FMW) - Web Tier
===============================================================================
Now examining product Oracle Fusion Middleware (FMW) - Web Tier.

Oracle Home = /u01/r12/application/fs1/FMW_Home/webtier.
Product Version = 11.1.1.9.0
Checking required bugfixes for FMW - Web Tier 11.1.1.9.0.
  Missing Bugfix: 21300463  ->  Patch 22288381
  Missing Bugfix: 21892015  ->  Patch 22288381
The above list shows missing bugfixes for FMW - Web Tier.

Checking required bugfixes for RSF within FMW Web tier 11.1.0.7.0.
All required bugfixes are present for RSF within FMW Web tier.

===============================================================================
Oracle Fusion Middleware (FMW) - oracle_common
===============================================================================
Now examining product Oracle Fusion Middleware (FMW) - oracle_common.

Oracle Home = /u01/r12/application/fs1/FMW_Home/oracle_common.
Product Version = 11.1.1.9.0
Checking required bugfixes for FMW - oracle common 11.1.1.9.0.
  Missing Bugfix: 9905685  ->  Patch 9905685
  Missing Bugfix: 21366277  ->  Patch 21366277
  Missing Bugfix: 21628307  ->  Patch 21628307
The above list shows missing bugfixes for FMW - oracle common.

===============================================================================
Oracle WebLogic Server (WLS)
===============================================================================
Now examining product Oracle WebLogic Server (WLS).

Oracle Home = /u01/r12/application/fs1/FMW_Home/wlserver_10.3.
Product Version = 10.3.6.0.7

Note that for Oracle WebLogic Server, patches rather than bugfixes are verified.

Checking required patches for Oracle WebLogic Server (WLS) 10.3.6.0.7.
  Missing Patch ID: 20780171
  Missing Patch ID: 22323006
The above list shows missing patches for Oracle WebLogic Server.
If you have applied other Oracle WebLogic Server patches, they may have included the bugfixes needed.
Contact Oracle Support if you require assistance in determining whether this is the case.

===============================================================================

Generating Patch Recommendation Summary.

===============================================================================
PATCH RECOMMENDATION SUMMARY
===============================================================================
One or more products have bugfixes missing.
The default patch recommendations to install these missing bugfixes are:

-------------------------------------------------------------------------------
Oracle Forms and Reports 10.1.2.3.0
-------------------------------------------------------------------------------
  Patch 22698265
    - Filename: p22698265_101232_LINUX.zip


-------------------------------------------------------------------------------
Oracle Fusion Middleware (FMW) - Web Tier 11.1.1.9.0
-------------------------------------------------------------------------------
  Patch 22288381
    - Filename: p22288381_111190_Generic.zip


-------------------------------------------------------------------------------
Oracle Fusion Middleware (FMW) - oracle_common 11.1.1.9.0
-------------------------------------------------------------------------------
  Patch 9905685
    - Filename: p9905685_111190_Generic.zip

  Patch 21366277
    - Filename: p21366277_111190_Generic.zip

  Patch 21628307
    - Filename: p21628307_111190_Generic.zip


-------------------------------------------------------------------------------
Oracle WebLogic Server (WLS) 10.3.6.0.7
-------------------------------------------------------------------------------
  Patch 20780171 [SU Patch [EJUW]: WLS PSU 10.3.6.0.12]
    - Filename: p20780171_1036_Generic.zip

  Patch 22323006 [SU Patch [DI8E]]
    - Filename: p22323006_1036_Generic.zip


Apply the required patches and rerun this script.

+-----------------------------------------------------------------------------+
A consolidated zip file with the required middle tier patches is available on
My Oracle Support via:

  Patch 24658753
    - EBS RELEASE 12.2 CONSOLIDATED FMW FIXES FOR 161018 AND 160719

+-----------------------------------------------------------------------------+
[WARNING]  Patch 20780171 [SU Patch [EJUW]: WLS PSU 10.3.6.0.12] is missing.
This is the recommended minimum WLS patch set.
You should install it now, and then rerun this script to check for any
further fixes available.
+-----------------------------------------------------------------------------+

See Doc ID 1594274.1 for any special instructions regarding these patches.
Footnotes in Doc ID 1594274.1 also apply to corresponding overlay patches.

Finished checking prerequisite patches for File Edition: run.
Tue Jan 24 01:20:24 EST 2017

Log file for this session: /u01/patches/checkMTpatch_22029.log

===============================================================================
[applmgr@ebs1 patches]$

applied the required patches as mentioned in the list above.


Apply Consolidated Seed Table Upgrade Patch (Required)

Note: If the Release 12.2.0 Vision or PROD instance (New Installation) was created using startCD 12.2.0.51 (Patch 22066363), you must apply Consolidated Seed Table Upgrade Patch 17204589:12.2.0 by merging with Patch 21900871:12.2.0 on the run file system using adop hotpatch mode.


sh $ADMIN_SCRIPTS_HOME/adstpall.sh
sh $ADMIN_SCRIPTS_HOME/adadminsrvctl.sh start

$ adop phase=apply patches=17204589,21900871 merge=yes hotpatch=yes

Successfully created out directory
    [STATEMENT] [END   2017/01/24 03:41:39] Performing Automatic DB cutover
    [STATEMENT] [START 2017/01/24 03:41:40] Running cutover since in hotpatch mode
    [STATEMENT] [END   2017/01/24 03:41:42] Running cutover since in hotpatch mode
    [STATEMENT] [START 2017/01/24 03:41:43] Compiling Invalid Objects
    [STATEMENT] [END   2017/01/24 03:41:48] Compiling Invalid Objects
  [STATEMENT] [END   2017/01/24 03:41:52] apply phase
  [STATEMENT] [START 2017/01/24 03:41:53] Generating Post Apply Reports
    [STATEMENT] APPLY Phase END TIME: 24-01-2017 03:41:54
      [STATEMENT] [START 2017/01/24 03:41:56] Generating Report to spool all logs from ad_zd_logs
        [STATEMENT] Report: /u01/r12/application/fs1/EBSapps/appl/ad/12.0.0/sql/ADZDSHOWLOG.sql

        [STATEMENT] Output: /u01/r12/application/fs_ne/EBSapps/log/adop/2/apply_20170124_015013/PROD_ebs1/adzdshowlog.out

      [STATEMENT] [END   2017/01/24 03:42:00] Generating Report to spool all logs from ad_zd_logs
  [STATEMENT] [END   2017/01/24 03:42:01] Generating Post Apply Reports
[STATEMENT] [END   2017/01/24 03:42:05] adzdoptl.pl run
[STATEMENT] adop phase=apply - Completed Successfully

[STATEMENT] Log file: /u01/r12/application/fs_ne/EBSapps/log/adop/2/adop_20170124_015013.log

adop exiting with status = 0 (Success)


Apply the Latest AD and TXK Delta Release Update Packs

applied the patch
adop phase=apply patches=21841299 hotpatch=yes

 Upgrade and New Installation Customers upgrading to Oracle E-Business Suite 12.2.6 Release Update Pack


sh $ADMIN_SCRIPTS_HOME/adadminsrvctl.sh stop
adop phase=apply patches=21830810 hotpatch=yes

Apply Oracle E-Business Suite 12.2.6 Release Update Pack


Stop the Oracle Weblogic Admin Server and Node Manager services.
Applying the patch in downtime mode requires all application tier services to be down. Therefore, Weblogic AdminServer and Node Manager that were started previously when applying the latest Release Update Packs for AD and TXK for Release 12.2 need to be shut down.
  1. Stop the Oracle Weblogic Admin Server on the run file system.
UNIX:
$ sh $ADMIN_SCRIPTS_HOME/adadminsrvctl.sh stop
  1. Stop the Node Manager service on the run file system.
UNIX:
$ sh $ADMIN_SCRIPTS_HOME/adnodemgrctl.sh stop
Apply Oracle E-Business Suite 12.2.6 Release Update Pack Patch 21900901 on the run edition application environment, using downtime mode.
UNIX:
$ adop phase=apply apply_mode=downtime patches=21900901


-------------------------------------------------------------------------------------------------
Note:EBSapps.env will be created only when first autoconfig is run. And don't run autoconfig in patch file system because the it will throw errors

ORA-20099: E-Business Suite Patch Edition does not exist.
it should only be run when at-least patch edition exist which is adop phase=prepare
--------------------------------------------------------------------------------------------------- 

SQL> select release_name from fnd_product_groups;

RELEASE_NAME
--------------------------------------------------
12.2.6


Pre install steps failing while installing EBS 12.2.6 using startCD51

While in process of installing EBS 12.2.6, the pre steps checks were failing with message:

"Not able to run DB Installer. Check staging area".

Solution-/etc/oraInst.loc file was pointing to wrong location.
Corrected the group and its location.


inventory_loc=

inst_group=

Another change i had to do is, changing the permission of database folder under Techinstallmedia.
(/u01/stage/Techinstallmedia)


chmod -R 777 database

Also the primary group for Oracle user should be dba. If not, then change it
usermod -g dba oracle


Sunday, January 22, 2017

Auditing in EBS(Though Old but still Gold)

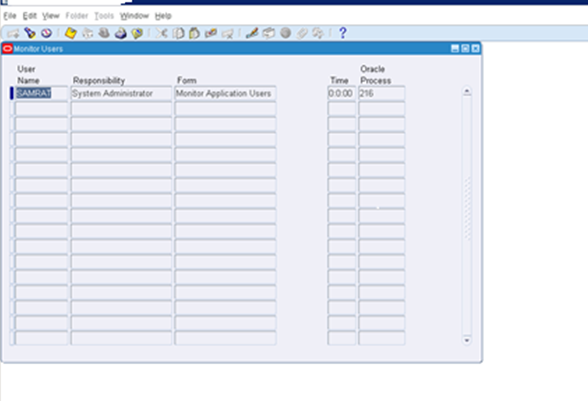
The online monitoring of user activity within Oracle Applications is achieved via the Monitor Users form (Form Name: FNDSCMON.fmx). The navigation path within the Sysadmin responsibility is Security > User > Monitor. In order to activate the capability of this form one has to select an appropriate option for the profile option Sign-On: Audit Level Profile Option. The available options are: -
NONE - No monitoring.
USER - Will only show you a list of logged in users.
RESPONSIBILITY - Will show you the user logged in and the responsibility they are using.
FORM - Will go down to the lowest level of detail and show you the User, Responsibility and Form being accessed.
The screen shot below indicates what you would see if you had chosen the FORM option for the profile option in question.
Log in with System Administrator Responsibility
Navigate to Security: Users > Monitor

Click (CTL + F11) keys to display the result.


This is a very useful screen since it tells you exactly which users are logged in and what are they doing in the system at any point in time. One may check this screen before bouncing or restarting the system to make sure all users are logged out.


It is a good practice to set the Sign-On: Audit Level profile option to “Form” since it gives the most detailed information above other choices but it will impact the system performance since it collects a lot of information, so you have keep that in mind.


Viewing Monitoring Reports about Users and their activity:
Depending on what audit level you have selected for the profile option under discussion you may also generate various reports as indicated below: –
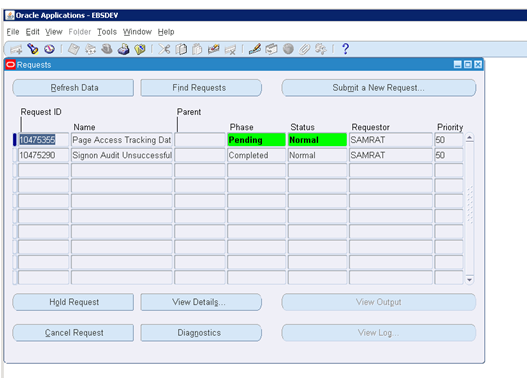
Sign-On Audit Concurrent Requests: View information about who is requesting what concurrent requests and from which responsibilities and forms.
Sign-On Audit Forms:View who is navigating to what form and when they do it.
Sign-On Audit Responsibilities: Used to view who is selecting what responsibility and when they are doing it.
Sign-On Audit Users:Used to view who signs on and for how long.
Sign-On Audit Unsuccessful: Show audit information about unsuccessful logins to Oracle Applications.

To view any of the given reports monitoring user activity use following steps:
Navigate to System Administrator Responsibility > Concurrent > Requests Or from the Menu Bar go to View > Requests
Choose Submit New Request > Single Request
Select report you want from the 4 requests given above.
Click Submit > Find
Select report you choose and click View output button to view the report.
Notifying Users of Unsuccessful Logins to their accounts:

Sign-On Audit can track user logins and provide users with a warning message if anyone has made an unsuccessful attempt to sign on with their application username since their last sign-on. This warning message appears after a user signs on. You do not have to audit the user with Sign-On Audit to use this notification feature.

To inform users about unsuccessful logins to their account, you can set the “Sign-On: Notification” profile option to Yes. To do that from System Administrator Responsibility > Profile > System > Find the profile option “Sign-On: Notification” and change its value to Yes.

Page access tracking:
Page Access Tracking in Oracle Applications Manager reports aggregate data for OAF- and JTF-based applications, with Sign-on Audit data gathered for Forms-based applications. Consequently, you can view usage flow paths that span all three technology stacks.
Page Access Tracking allows administrators to track application usage statistics and perform Web site traffic analysis, aggregate data about user flows as well as drill down to a particular user session.
Page Access Tracking transparently captures application-rich context information for every user click. In terms of performance, the data capture has negligible overhead.


Enable page tracking.
Go to OAM>Site Map > Monitoring > Applications Usage Reports > Page Access Tracking and Sign-on Audit Configuration>>Click on Configurations


And then at the bottom, click on apply. Next Migrating Page Access Tracking Data
Page Access Tracking data is logged in the database in a staging area. It needs to be migrated and mined before the UI reports are refreshed. How frequently Page AccessTracking Data needs to be migrated and mined depends on how up-to-date the UI reports need to be. Generally speaking, the recommendation is to run the concurrent program at least once a day (for example at midnight) for the reports to be relatively up to date.
The "Page Access Tracking Data Migration" can be scheduled either in Oracle Forms, or within the OAM responsibility.
Schedule the concurrent program "Page Access Tracking Data Migration" using Concurrent Manager:

After the Concurrent Program completes, you should be able to view the latest data reports and statistic


To view the output:


Click on the respective pointers to know more about in details. For example, I clicked on one of the pointers under Responsibility for 16th Jan 2017


We can also click on the respective pointers to drill down further.


Debug Logging (Unexpected Logging)
The Oracle E-Business Suite Debug Log is used for a variety of purposes. As the name suggests, it is often used to diagnosing and debugging problems encountered in Oracle E-Business Suite code. This log can also assist with diagnosing security problems and detecting security attacks. It can also be leveraged for post-attack / forensic analysis.
The debug log is documented in the Oracle E-Business Suite Maintenance Guide - Logging. The current recommendation in this chapter is to set this to “UNEXPECTED”. This is important from a security auditing perspective, since this is the level at which many of the security errors are written out to the log.
The default configuration (and the current recommendation) for Debug Logging is set to log information to the database. This makes it easier to correlate and maintain logs in a multi-tier application environment.
The Debug Logging mechanism also supports logging to the file system using the following profile:
AFLOG_FILENAME
FND: Debug Log Filename
"/path/to/apps.log"
Customers may want to consider enabling logging on the file system, as there are some security benefits to maintaining the log on the file system. File system logging will generally provide better protection against an attacker being able to modify logging records via a SQL injection attack.

Example for collecting OAF Log files:


Enable Diagnostics -- Set User (should use same user to reproduce the issue) level system profile values as follows:
FND: Debug Log Level = Statement
FND: Debug Log Enabled = Yes
FND: Debug Log Module = %
FND: Debug Filename = /tmp/trace.log - Should have proper write permissions.
FND: Diagnostics = Yes
Step 2 
The Diagnostics button should now be visible on the page - next to Close window/Preferences/Help/Personalise Page
1. Obtain the Trace File
a: Click on the Diagnostics button and choose "Show Log".
b: Under Categories, verify all checkboxes are checked; also, enter "%" for Module.
c: Under Sequence, verify "Other" is checked, and "%" is entered in the field next to it.
d: The Search should return all logged statements in the database.
e: Click on the Export button to export the log.

Please upload the trace file obtained to Oracle support

2. From Filename specified in profile FND: Debug Filename.

3. From fnd_log_messages
After reproducing the issue we can also get the logs from database table
fnd_log_messages this way.
Run this query with login id in place of <USER_NAME> in query to know the USER_ID of the person logging in. 
    select USER_ID from FND_USER where USER_NAME like '<USER_NAME>'
Before logging in (after setting the profiles) run the query below with user_id in place of <USER_ID> and check the count. 
   select session_id, count(*)
   from fnd_log_messages
   where user_id = <USER_ID>
   group by session_id;

After logging in run the query again and check that the count has increased.
Also get the SESSION_ID of the present login session from the new row.

Use the USER_ID and SESSION_ID to query from fnd_log_messages or run the spool script to get the log file log.lst 
set termout off
set pages 30000
set lines 4000

col MESSAGE_TEXT format a3950
col TIMESTAMP format a22
col LOG_LEVEL format a2

spool log.lst

select
T1.LOG_LEVEL
||'^'|| to_char(T1.TIMESTAMP, 'dd-mon-yyyy hh24:mi:ss')
||'^'|| T1.MESSAGE_TEXT
from
( select
rownumrownumber, substr(message_text,1,3950) message_text
,module,log_level, timestamp
from fnd_log_messages
where user_id = <USER_ID>
and session_id = <SESSION_ID>
order by timestamp asc
) T1;

spool off
 

If there are no Self service log messages returned, please run the following
select
rownumrownumber, log_level, substr(message_text,1,3950) message_text, timestamp,module
from fnd_log_messages
where user_id = <USER_ID>
and session_id = <SESSION_ID>
and module like '%selfservice%'
order by timestamp asc


Enabling Audit in Database.

Setting up or enabling the standard audit trail is quite easy and is outlined in the 2-Day+ Security Guide as follows:
1.  Start Database Control
2.  Log in as SYS with SYSDBA privileges
3.  Click Server to display the Server subpage
4.  Click Initialization Parameters in the Database Configuration section
5.  Click SPFile to display the SPFile subpage. If you don’t use anSPFile just continue to the next step
6.  Enter audit_trail in the Name field to find the AUDIT_TRAIL parameter and then click Go
7.  Enter the type of auditing you want in the Value field where value can be:
DB – Enables Database Auditing where records will primarily be written to the sys.aud$
OS – Enables auditing records to be written to the operating system where you must also specify AUDIT_FILE_DEST which tells Oracle where to write the audit record.
NONE – Will disable standard auditing
DB, EXTENDED – does all that the type of DB does, plus populating the SQL bind and SQL text CLOB-type columns of the sys.aud$ table when available
XML – will write to the operating system audit records in XML format
EXTENDED – will write to the operating system audit records in XML format but also populates the SQL bind and SQL text CLOB-types columns of the sys.aud$ table when available
8.  Click Apply
9.  Restart the Oracle instance
While setting up standard auditing from the control panel is quite acceptable, this is one of the tasks that can also easily be accomplished through the standard PL*SQL interface.
1.  Log in as SYS with SYSDBA privileges
Sqlplus / as sysdba
2.  Check the current settings
SQL> show parameter audit
NAME                                 TYPE        VALUE
---------------------- ----------- ------------------------------
audit_file_dest        string      /opt/app/oracle/admin/db11/adump
audit_sys_operationsboolean     FALSE
audit_syslog_level     string
audit_trail            string      DB
3.  Set the type of auditing you want by setting the audit_trail parameter
SQL> alter system set audit_trail=OS scope=spfile;
System altered.
4.  Set the auditing destination
SQL> alter system set audit_file_dest='/opt/app/oracle/admin/db11/adump' scope=spfile;
System altered.
5.  Restart the Oracle instance
SQL> SHUTDOWN
SQL> STARTUP
Also note that there are two additional parameters audit_sys_operations and audit_syslog_level that you should consider setting if you are concerned about the SYS account activity.
1.  audit_sys_operations - this initialization parameter tells Oracle to turn on auditing of the SYS connections, and users connecting with the SYSDBA or SYSOPER privilege. It has either a TRUE or FALSE value
2.  audit_syslog_level – this initialization parameter enables SYS and standard OS auditing records to be written to the system using the SYSLOG utility
Now that we’ve enables operating system auditing, it is always nice to see exactly what we’ve accomplished. While this is not an exhaustive example, it does touch the surface of what we are trying to accomplish here. Suppose now that we have an un-authorized access attempt (failed login) to our database through the use of the SCOTT/TIGER account.
- Advertisement -
1. we’ve locked this account and any attempts will be now be met with ‘the account is locked’ message:
[oracle@ludwigadump]$ sqlplusscott/tiger
SQL*Plus: Release 11.1.0.6.0 - Production on Thu Dec 10 06:51:43 2009
Copyright (c) 1982, 2007, Oracle.  All rights reserved.
ERROR:
ORA-28000: the account is locked
2.  And now, because of auditing, this attempt will not go unnoticed and will be reported in the audit_file_dest location:
[oracle@ludwig ~]$ cd $ORACLE_HOME/adump
[oracle@ludwigadump]$ more ora_3817.aud
Audit file /opt/app/oracle/admin/db11/adump/ora_3817.aud
Oracle Database 11g Enterprise Edition Release 11.1.0.6.0 - Production
With the Partitioning, OLAP, Data Mining and Real Application Testing options
ORACLE_HOME = /opt/app/oracle/product/11.1.0/db_1
System name:    Linux
Node name:      ludwig
Release:        2.6.18-8.el5
Version:        #1 SMP Thu Mar 15 19:57:35 EDT 2007
Machine:        i686
Instance name: db11
Redo thread mounted by this instance: 1
Oracle process number: 18
Unix process pid: 3817, image: oracle@ludwig (TNS V1-V3)

Thu Dec 10 06:48:46 2009
SESSIONID: "280057" ENTRYID: "1" STATEMENT: "1" USERID: "SCOTT" USERHOST: "ludwig" TERMINAL: "pts/1" ACTION: "100"
RETURNCODE: "28000" COMMENT$TEXT: "Authenticated by: DATABASE" OS$USERID: "oracle"
Now that you have the settings changed, you can start monitoring the activity on the SYS account. Remember standard auditing can monitor and record various user database actions such as SQL statements, privileges, schemas, objects, and network and multitier activity. Now is the time to dig in, see how far standard auditing can take you to gain compliancy and then fill in the gaps. The issue becomes whether you can provide auditors everything they need to pass your audit. If you can monitor all database traffic and take appropriate action then you will pass, otherwise you are in for a lot of work. But more on that latter.


Database Audit and Audit trail purging
DBMS_AUDIT_MGMT.
There are several reason to enable database audit and at least as much reason to not enable database audit.

Enable Audit

Ok, first of all we have to set the corresponding init.ora parameter and enable the database audit. In my case I’ll also enable audit of all sys operation. This is not necessary when you plan to use standard audit. I just did it because I restarted the database anyway. ok lame excuse, I will come back again later on.
Set the init.ora parameter:
ALTER system SET audit_sys_operations=TRUE scope=spfile;

ALTER system SET audit_trail=db_extended scope=spfile;

startup force;

SHOW parameter audit
Initialize the audit infrastructure. In this example I’ve initialized the standard audit and set a default interval of 10 days.
BEGIN
  DBMS_AUDIT_MGMT.INIT_CLEANUP(
    AUDIT_TRAIL_TYPE => DBMS_AUDIT_MGMT.AUDIT_TRAIL_AUD_STD,
    DEFAULT_CLEANUP_INTERVAL => 240 /*hours*/
  );
END;
/

commit;
Create a dedicated tablespace for the audit data and change the location of the audit trail. If this is not done AUD$ will remain in the SYSAUX tablespace.
CREATE tablespaceaudit_datadatafile '/u01/oradata/TDB03/audit01TDB03.dbf'
SIZE 100M autoextend ON NEXT 50M maxsize 5G;

BEGIN
  DBMS_AUDIT_MGMT.SET_AUDIT_TRAIL_LOCATION(
    AUDIT_TRAIL_TYPE => DBMS_AUDIT_MGMT.AUDIT_TRAIL_AUD_STD,
    AUDIT_TRAIL_LOCATION_VALUE => 'AUDIT_DATA'
  );
END;
/

commit;
Review the audit settings
col PARAMETER_NAME FOR a30
col PARAMETER_VALUE FOR a15
col AUDIT_TRAIL FOR a20
SELECT PARAMETER_NAME, PARAMETER_VALUE, AUDIT_TRAIL
FROM DBA_AUDIT_MGMT_CONFIG_PARAMS
WHERE audit_trail = 'STANDARD AUDIT TRAIL';

PARAMETER_NAME                 PARAMETER_VALUE AUDIT_TRAIL
------------------------------ --------------- --------------------
DEFAULT CLEAN UP INTERVAL      12              STANDARD AUDIT TRAIL
DB AUDIT TABLESPACE            AUDIT_DATA      STANDARD AUDIT TRAIL
DB AUDIT CLEAN BATCH SIZE      10000           STANDARD AUDIT TRAIL

col segment_name FOR a10
SELECT owner,segment_name,tablespace_name FROM dba_segments WHERE segment_name ='AUD$';

OWNER                          SEGMENT_NA TABLESPACE_NAME
------------------------------ ---------- ------------------------------
SYS                            AUD$       AUDIT_DATA
Ok, the audit infrastructure has been setup and configured. Now lets enable audit for certain system privilege and objects. The first part of the following audit statements have been taken from $ORACLE_HOME/rdbms/admin/secconf.sql. This script is used in 11g to enable audit during database creation.
audit ALTER any TABLE BY access;
audit CREATE any TABLE BY access;
audit DROP any TABLE BY access;
audit CREATE any PROCEDURE BY access;
audit DROP any PROCEDURE BY access;
audit ALTER any PROCEDURE BY access;
audit GRANT any privilege BY access;
audit GRANT any object privilege BY access;
audit GRANT any ROLE BY access;
audit audit system BY access;
audit CREATE external job BY access;
audit CREATE any job BY access;
audit CREATE any library BY access;
audit CREATE public DATABASE link BY access;
audit exempt access policy BY access;
audit ALTER USER BY access;
audit CREATE USER BY access;
audit ROLE BY access;
audit CREATE SESSION BY access;
audit DROP USER BY access;
audit ALTER DATABASE BY access;
audit ALTER system BY access;
audit ALTER profile BY access;
audit DROP profile BY access;
audit DATABASE link BY access;
audit system audit BY access;
audit profile BY access;
audit public synonym BY access;
audit system GRANT BY access;

audit DELETE ON sys.aud$;
audit ALTER ON DEFAULT;
audit GRANT ON DEFAULT;
There are a few data dictionary views to review which object and system privilege has audit enabled.
SELECT  * FROM DBA_STMT_AUDIT_OPTS;

USER_NAME  PROXY_NAME AUDIT_OPTION                 SUCCESS    FAILURE
---------- ---------- ---------------------------- ---------- ----------
                      ALTER SYSTEM                 BY ACCESS  BY ACCESS
                      SYSTEM AUDIT                 BY ACCESS  BY ACCESS
                      CREATE SESSION               BY ACCESS  BY ACCESS
                      CREATE USER                  BY ACCESS  BY ACCESS
                      ALTER USER                   BY ACCESS  BY ACCESS
                      DROP USER                    BY ACCESS  BY ACCESS
                      PUBLIC SYNONYM               BY ACCESS  BY ACCESS
                      DATABASE LINK                BY ACCESS  BY ACCESS
                      ROLE                         BY ACCESS  BY ACCESS
                      PROFILE                      BY ACCESS  BY ACCESS
                      CREATE ANY TABLE             BY ACCESS  BY ACCESS
                      ALTER ANY TABLE              BY ACCESS  BY ACCESS
                      DROP ANY TABLE               BY ACCESS  BY ACCESS
                      GRANT TABLE                  BY ACCESS  BY ACCESS
                      CREATE PUBLIC DATABASE LINK  BY ACCESS  BY ACCESS
                      GRANT ANY ROLE               BY ACCESS  BY ACCESS
                      SYSTEM GRANT                 BY ACCESS  BY ACCESS
                      ALTER DATABASE               BY ACCESS  BY ACCESS
                      CREATE ANY PROCEDURE         BY ACCESS  BY ACCESS
                      ALTER ANY PROCEDURE          BY ACCESS  BY ACCESS
                      DROP ANY PROCEDURE           BY ACCESS  BY ACCESS
                      ALTER PROFILE                BY ACCESS  BY ACCESS
                      DROP PROFILE                 BY ACCESS  BY ACCESS
                      GRANT ANY PRIVILEGE          BY ACCESS  BY ACCESS
                      CREATE ANY LIBRARY           BY ACCESS  BY ACCESS
                      EXEMPT ACCESS POLICY         BY ACCESS  BY ACCESS
                      GRANT ANY OBJECT PRIVILEGE   BY ACCESS  BY ACCESS
                      CREATE ANY JOB               BY ACCESS  BY ACCESS
                      CREATE EXTERNAL JOB          BY ACCESS  BY ACCESS

SELECT * FROM DBA_PRIV_AUDIT_OPTS;

USER_NAME  PROXY_NAME PRIVILEGE                    SUCCESS    FAILURE
---------- ---------- ---------------------------- ---------- ----------
                      CREATE EXTERNAL JOB          BY ACCESS  BY ACCESS
                      CREATE ANY JOB               BY ACCESS  BY ACCESS
                      GRANT ANY OBJECT PRIVILEGE   BY ACCESS  BY ACCESS
                      EXEMPT ACCESS POLICY         BY ACCESS  BY ACCESS
                      CREATE ANY LIBRARY           BY ACCESS  BY ACCESS
                      GRANT ANY PRIVILEGE          BY ACCESS  BY ACCESS
                      DROP PROFILE                 BY ACCESS  BY ACCESS
                      ALTER PROFILE                BY ACCESS  BY ACCESS
                      DROP ANY PROCEDURE           BY ACCESS  BY ACCESS
                      ALTER ANY PROCEDURE          BY ACCESS  BY ACCESS
                      CREATE ANY PROCEDURE         BY ACCESS  BY ACCESS
                      ALTER DATABASE               BY ACCESS  BY ACCESS
                      GRANT ANY ROLE               BY ACCESS  BY ACCESS
                      CREATE PUBLIC DATABASE LINK  BY ACCESS  BY ACCESS
                      DROP ANY TABLE               BY ACCESS  BY ACCESS
                      ALTER ANY TABLE              BY ACCESS  BY ACCESS
                      CREATE ANY TABLE             BY ACCESS  BY ACCESS
                      DROP USER                    BY ACCESS  BY ACCESS
                      ALTER USER                   BY ACCESS  BY ACCESS
                      CREATE USER                  BY ACCESS  BY ACCESS
                      CREATE SESSION               BY ACCESS  BY ACCESS
                      AUDIT SYSTEM                 BY ACCESS  BY ACCESS
                      ALTER SYSTEM                 BY ACCESS  BY ACCESS

SELECT * FROM DBA_OBJ_AUDIT_OPTS;

OWNER OBJECT_NAME          OBJECT_TYPE ALT AUD COM DEL GRA IND INS LOC REN SEL UPD REF EXE CRE REA WRI FBK
----- -------------------- ----------- --- --- --- --- --- --- --- --- --- --- --- --- --- --- --- --- ---
SYS   AUD$                 TABLE       -/- -/- -/- S/S -/- -/- -/- -/- -/- -/- -/- -/- -/- -/- -/- -/- -/-
SYS   VERIFY_FUNCTION      PROCEDURE   -/- -/- -/- -/- S/S -/- -/- -/- -/- -/- -/- -/- -/- -/- -/- -/- -/-
SYS   VERIFY_FUNCTION_11G  PROCEDURE   -/- -/- -/- -/- S/S -/- -/- -/- -/- -/- -/- -/- -/- -/- -/- -/- -/-

SELECT * FROM ALL_DEF_AUDIT_OPTS;

ALT AUD COM DEL GRA IND INS LOC REN SEL UPD REF EXE FBK REA
--- --- --- --- --- --- --- --- --- --- --- --- --- --- ---
S/S -/- -/- -/- S/S -/- -/- -/- -/- -/- -/- -/- -/- -/- -/-
Audit trail housekeeping
So far we’ve spend quite some time on setting up the audit. Let’s come to the actual part of the post, the housekeeping. The plan is to have regular database job, which purge the audit data as required. For this I defined the following steps:
Create a report of your audit trail (optional)
Export your audit trail information for longterm archiving (optional)
Set the archive timestamp as soon as audit data has been archived
Purge archived audit data
I the current example I’ll skip the first to steps.
Create daily archive timestamp job. This job will be a regular dbms_scheduler job.
BEGIN
  DBMS_SCHEDULER.CREATE_JOB (
    job_name   => 'DAILY_AUDIT_ARCHIVE_TIMESTAMP',
    job_type   => 'PLSQL_BLOCK',
    job_action => 'BEGIN DBMS_AUDIT_MGMT.SET_LAST_ARCHIVE_TIMESTAMP(AUDIT_TRAIL_TYPE =>
                   DBMS_AUDIT_MGMT.AUDIT_TRAIL_AUD_STD,LAST_ARCHIVE_TIME => sysdate-10); END;',
    start_date => sysdate,
    repeat_interval => 'FREQ=HOURLY;INTERVAL=24',
    enabled    =>  TRUE,
    comments   => 'Create an archive timestamp'
  );
END;
/
Create daily purge job
BEGIN
  DBMS_AUDIT_MGMT.CREATE_PURGE_JOB(
    AUDIT_TRAIL_TYPE           => DBMS_AUDIT_MGMT.AUDIT_TRAIL_AUD_STD,
    AUDIT_TRAIL_PURGE_INTERVAL => 24 /* hours */,
    AUDIT_TRAIL_PURGE_NAME     => 'Daily_Audit_Purge_Job',
    USE_LAST_ARCH_TIMESTAMP    => TRUE
  );
END;
/

commit;
The defined AUDIT JOB’s are then visible in DBA_AUDIT_MGMT_CLEANUP_JOBS.
col JOB_NAME FOR a30
col JOB_FREQUENCY FOR a40
SELECT JOB_NAME,JOB_STATUS,AUDIT_TRAIL,JOB_FREQUENCY FROM DBA_AUDIT_MGMT_CLEANUP_JOBS;

JOB_NAME               JOB_STAT AUDIT_TRAIL          JOB_FREQUENCY
---------------------- -------- -------------------- ------------------------
DAILY_AUDIT_PURGE_JOB  ENABLED  STANDARD AUDIT TRAIL FREQ=HOURLY;INTERVAL=24
As we can see in dba_scheduler_jobs, DBMS_SCHEDULER.CREATE_JOB is just creating a other scheduler job.
col next_run_date FOR a50
SELECT job_name, next_run_date, state, enabled FROM dba_scheduler_jobs WHERE job_name LIKE '%AUDIT%';

JOB_NAME                       NEXT_RUN_DATE                                      STATE           ENABL
------------------------------ -------------------------------------------------- --------------- -----
DAILY_AUDIT_ARCHIVE_TIMESTAMP  31-MAY-11 01.46.58.000000 PM +02:00                SCHEDULED       TRUE
DAILY_AUDIT_PURGE_JOB          31-MAY-11 01.49.34.900000 PM EUROPE/VIENNA         SCHEDULED       TRUE