Saturday, June 29, 2019

Create users in Oracle Cloud OCI

The first time when you sign in for OCI services, Oracle setup up a default administrator for you and credentials will be shared with you in an email. This user will be the first IAM user and this user can access all the OCI services. This means they can create and manage IAM resources such as, groups, policies, and compartments. And they can create and manage the cloud resources such as virtual cloud networks (VCNs), instances, block storage volumes, and any other new types of Oracle Cloud Infrastructure resources that become available in the future.In an enterprise environment, you will need more users and these users will be created by the default administrator user. A good example of this distinction is provided in https://docs.cloud.oracle.com/iaas/Content/Identity/Concepts/overview.htm


In this post, we are going to setup a new user which will be a federated user. We will create a separate compartment for this user and it will not have any access to the root compartment.


Create a new compartment:-


Create a new group


sandbox group has been created.

Now, we will create a policy. Please note that the container to be choosen should be root.


As per the above statement, users added to the group Sandbox will be able to create resource only in compartment Sandbox. If we try to create any resource such as VCN in any other compartment, we will get error.


Let's proceed with creating the federation of the user.


As of now, we only have the default identity provider. Click on the default OracleIdentityprovider.


Click on groups and create a new group.


Next, you need to map the Oracle Identity Cloud Service group to the Oracle Cloud Infrastructuregroup you created so that members of the IDCS group will have the permissions you granted to the OCI group.


Click on edit mapping and +ADD mapping.


Users that are members of the Oracle Identity Cloud Service groups mapped to the Oracle Cloud Infrastructure groups are now listed in the Console on the Users page

Click on create IDC User


Copy paste the link and open it in a new browser to reset the password


Once password has been reset, login to the OCI using the console.


When this user signs in they can see the compartments they have access to and they can only view, create, and manage resources in the Sandbox compartment. This user cannot create compartments or create other users. Ensure to let the user know which compartments they have access to.


Hope this helps someone...


Reference:https://docs.cloud.oracle.com/iaas/Content/GSG/Tasks/addingusers.htm?TocPath=Getting%20Started%7C_____8

https://docs.cloud.oracle.com/iaas/Content/Identity/Tasks/managingusersfederated.htm


Saturday, June 22, 2019

Tips to pass Oracle Cloud Infrastructure (1Z0-932)

I was bit  offline for few months as i was preparing for my Oracle Cloud Exam. After burning the midnight oil for 5 months, finally i am able to pass the exam. Hence, here i am sharing the tips which will help the aspirants to clear the exam. Also, in the coming days, i will be posting on how to create and use various services in Oracle Cloud Infrastructure.


Now coming to the certification, the first step will be to visit the official oracle website https://education.oracle.com/oracle-cloud-infrastructure-2018-architect-associate/pexam_1Z0-932. The exam pattern keeps on changing and thus this website will give all those details. As of now the exam contains 66 questions and the passing score is 65%.

How to achieve this certification:

1. Go through the Oracle learning YouTube videos. This will give you the overview of various OCI modules.

https://www.youtube.com/playlist?list=PLKCk3OyNwIzvn8dpgrIKNdBOHT7AoMZlw

 OCI Level 100 – Getting Started
 OCI Level 100 – Identity and Access Management
 OCI Level 100 – Virtual Cloud Network
 OCI Level 100 – Connectivity
 OCI Level 100 – Compute
 OCI Level 100 – Block Volume
 OCI Level 100 – File Storage
 OCI Level 100 – Object Storage
 OCI Level 100 – Load Balancer
 OCI Level 100 – Database
 OCI Level 100 – Autonomous Database
 OCI Level 100 – DNS

You can also browse through the advanced modules which is part 200. https://www.youtube.com/playlist?list=PLKCk3OyNwIzuBQ13lwsZpqO4__rLrO1eA

Although i think, part 100 is much better than the part 200.

2. Once you grasp the basic concepts from the videos above, now go through these FAQs to get some in-depth understanding on your concepts of OCI resources:

https://cloud.oracle.com/load-balancing/faq

https://cloud.oracle.com/database/faq

https://cloud.oracle.com/edge/dns/faq

https://cloud.oracle.com/storage/object-storage/faq

https://cloud.oracle.com/storage/block-volume/faq

https://cloud.oracle.com/compute/faq

https://cloud.oracle.com/cloud-security/identity/faq


3. Now it is the time to get your hands dirty and at this moment, you should get the free 30 days trial for OCI and practice whatever you have learnt. Make sure you plan it accordingly as the trial is only for 30 days.

4. Next i would recommend to download the latest OCI study guide and go through the concepts. https://learn.oracle.com/education/downloads/OracleCloudInfrastructurestudyguide.pdf

5. Now at this stage you are ready for the exam, so attempt this Practice Exam:
http://oukc.oracle.com/static12/opn/login/?t=checkusercookies|r=-1|c=2164389233

6. There are some good practice tests available in Udemy for this exam.I would prefer going though the mock test series from Deepak Brahmbatt.

Also, i am sharing some of my notes, which i had prepared for this exam. Hope it helps someone.

*********************************


Boot volumes:

They can be cloned
they can be preserved while terminating the instance
they cannot be detached from the running instance
Boot volume is associated with AD.

Block volumes can be restored from their backups any region but clone can be done only in the same availability domain and their size can also be changed.
default size is 1 tb

You can attach up to 32 volumes per compute instance, resulting in up to 32 TB*32=1 PB


File systems storage

It can be mounted and multiple file systems can be exposed.
it can be created in a single subnet and can be accessed in any AD in a region
No two File systems associated with the same mount target can have overlapping export paths (e.g. FS
paths like /example and /example/path are not allowed)


Subnets can span a region or can exist in single availability domain. Now it is a regional service
Load balancer is also no AD specific.


Object Storage

Multipart uploads can accommodate objects that are too large for a single upload operation.
Oracle recommends that you perform a multipart upload to upload objects larger than 100
MiB. The maximum size for an uploaded object is 10 TiB. Object parts must be no larger than
50 GiB. For very large uploads performed through the API, you have the flexibility of pausing
between the uploads of individual parts, and resuming the upload as your schedule and
resources allow.


Autonomous Database:-

After provisioning, you can scale the number of CPU cores or the storage
capacity of the database at any time without impacting availability or performance.
Autonomous Database handles creating the database, as well as the following maintenance
tasks:
l Backing up the database
l Patching the database
l Upgrading the database
l Tuning the database


DBaaS

While considering the migration of on premise database


Data Pump Conventional Export/Import
This method can be used regardless of the endian format and database character set of
the on-premises database.
For the steps this method entails, see Data Pump Conventional Export/Import.
l Data Pump Transportable Tablespace
This method can be used only if the on-premises platform is little endian, and the
database character sets of your on-premises database and the Oracle Cloud
Infrastructure Database database are compatible.
For the steps this method entails, see Data Pump Transportable Tablespace.
l RMAN Transportable Tablespace with Data Pump
This method can be used only if the on-premises platform is little endian, and the
database character sets of your on-premises database and the Oracle Cloud
Infrastructure Database database are compatible.
For the steps this method entails, see RMAN Transportable Tablespace with Data Pump.
l RMAN CONVERT Transportable Tablespace with Data Pump
This method can be used only if the database character sets of your on-premises
database and the Oracle Cloud Infrastructure Database database are compatible.
This method is similar to the Data Pump Transportable Tablespace method, with the
addition of the RMAN CONVERT command to enable transport between platforms with
different endianness. Query V$TRANSPORTABLE_PLATFORM to determine if the onpremises
database platform supports cross-platform tablespace transport and to
determine the endian format of the platform. The Database service platform is littleendian
format.
For the steps this method entails, see RMAN CONVERT Transportable Tablespace with
Data Pump.


Load balancers Faq:-

load balancers cant have a private subnet. It needs public ip address and private ip adress.

Oracle recommends that you distribute your backend servers across all availability domains
within the region.

It is a specific to AD

There are two type of checks tcp level checks and http level checks

health status

ok-no attention
warning(yellow);resoruce needs some attanetion
critical(red)-require immediate attention
unknown(gray)-health status is unavailabe.the resource is not responding


scenario:-if listener is working and requests are not passing through it, then check the security lists.
All entity health status indicators report OK, but traffic does not flow (as with misconfigured listeners). If the listener is not at fault, check the security list configuration.
All entity health statuses report as unhealthy. You have checked your health check configuration and your services run properly on your backend servers.
In this case, your security lists might not include the IP range for the source of the health check requests. You can find the health check source IP on the Details page for each backend server. You can also use the API to find the IP in the sourceIpAddress field of the HealthCheckResult object.

Load Balancer currently only supports IPv4 traffic.

Can I change the shape of my load balancer?
Currently, you cannot change the shape of your load balancer once you created the load balancer. To change the shape of your load balancer (e.g. to increase or decrease the pre-provisioned bandwidth for ingress plus egress traffic), you can use the Console or API to create another load balancer with the new shape and update the DNS A-record associated with you load balancer’s IP address

The Load Balancing service handles requests asynchronously

You can confirm the availability of your backend servers via request or connection attempts based on a time-interval you specify. Currently, we support the following TCP-level or HTTP-level health checks for your backend servers:
TCP-level health checks attempt to make a TCP connection with the backend servers and validate the response based on the connection status.
HTTP-level health checks send requests to the backend servers at a specific URI and validate the response based on the status code or entity data (body) returned

Storage:-

What are the core components of the Oracle Object Storage service?
Objects: All data, regardless of content type, is stored as objects in Oracle Object Storage. For example, log files, video files, and audio files are all stored as objects.

Bucket: A bucket is a logical container that stores objects. Buckets can serve as a grouping mechanism to store related objects together.

Namespace: A namespace is the logical entity that lets you control a personal bucket namespace. Oracle Cloud Infrastructure Object Storage bucket names are not global.

Bucket names need to be unique within the context of a namespace, but can be repeated across namespaces. Each tenant is associated with one default namespace (tenant name) that spans all compartments.


Oracle Object Storage is a regional service:-

You can access Oracle Object Storage from anywhere as long as you have access to an internet connection and the required permissions to access the service.

Block Volume:-

If the compute instance terminates, you can attach the volume to another compute instance and regain access to the persistent data in that volume.

Your operating system accesses block volumes using iSCSI protocol

To provide the highest performance, block volumes are optimized to attach to any compute instance within the same Availability Domain.
You can detach a volume from one compute instance, and then attach the block volume to another compute instance without rebooting your compute servers.


resize a block volume

Expand the size of existing boot and block volumes offline up to 32 TB.
Restore from a backup of boot or block volume to a larger size volume up to 32 TB.
Clone an existing block or boot volume to a larger size volume up to 32 TB.

Two types of volume attachment:-
iSCSI or Paravirtualized. Paravirtualized volume attachment is supported for VM instances only.

Block volumes backup copies the existing block volume  backups to another region.

Can I clone a volume from one Availability Domain (AD) to another?
No. Block volumes are AD-local. You can clone volumes only within the same AD.

block volumes backup can be cloned from one region to another region
block volumes backup can be restored in any availability domain in same region.
You can only create a clone for a volume within the same region, availability domain and tenant.
You can share custom images across tenancies and regions


Can I delete a boot volume?
Yes, you can delete an unattached boot volume by using the console or API/CLI. Additionally, you can optionally chose to automatically delete the boot volume when 'Terminating' an instance by selecting the checkbox in the delete confirmation dialog.
Oracle Cloud Infrastructure does not allow you to delete the boot volume currently attached to an instance.
You can stop an instance, detach its boot volume, and delete the detached boot volume. The stopped instance cannot be started after its boot volume is deleted. You can only terminate that instance.

What happens to my data when I terminate my instance?
After you terminate your compute instance, you have the option to keep its boot volume for later reuse

What is a volume group backup? How does it work?
A coordinated point-in-time crash consistent backup of the entire set of volumes that are in a volume group. This operation creates a volume group backup. There is no impact to the source volume group and volumes during the backup process.

Volume group backups are replicated across all Availability Domains within the region where the source volume group resides. A volume group backup can then be used to create a new volume group to any Availability Domain within the region the backup resides, by restoring all the volumes data that are in the volume group.


Fast Connect

Connectivity models
it is not encrypted

Oracle Provider:-
Third party provider
Colocation with Oracle in an Oracle Cloud inffrastructure Fastconnect location

How many VPN tunnels can I have from a single CPE device?
You can have a maximum of eight tunnels from a unique CPE IP address per region. If you want more than eight tunnels, either use a different IP address for the additional ones, or use a different CPE device (recommended).


Data transfer utility

TRANSFER JOB
A transfer job is the logical representation of a data migration to Oracle Cloud
Infrastructure. A transfer job consists of one or more transfer packages that each contain
one or more transfer disks.
TRANSFER DISK
A transfer disk is an HDD that is specially prepared to copy and upload data to Oracle
Cloud Infrastructure. You copy your data to one or more of these disks and ship the disks
in a parcel to Oracle to upload your data.
The following transfer disks are supported:
l SATA II/III 2.5" or 3.5" HDDs
l External USB 2.0/3.0 HDDs


DATA TRANSFER UTILITY
The Data Transfer Utility is the command-line software that Oracle provides for you to
prepare transfer disks for your data and for shipment to Oracle. In addition, you can use
this software to manage transfer jobs and packages.
HOST
The computer at your site on which you download the Data Transfer Utility to perform
Data Transfer Service tasks.

TRANSFER PACKAGE
A transfer package is the logical representation of the parcel containing the transfer disks
that you ship to Oracle to upload to Oracle Cloud Infrastructure.


The dm-crypt software generates a master AES-256 bit encryption key that is used for
all data written to or read from the disk

Create the required IAM Users / Groups / Policies; create the required Object Storage
Bucket; Install the Data Transfer Utility on the host machine that will be used to load
data.

Preparing for and copying your data
1. Create a transfer job.
2. Request a transfer appliance.
3. Monitor your transfer appliance request.
4. Set up your host machine.
CHAPTER 8 Data Transfer
Oracle Cloud Infrastructure User Guide 638
5. Unpack and prepare your transfer appliance.
6. Configure networking on your transfer appliance.
7. Write data to your transfer appliance.
Preparing your appliances for shipment
1. Finalize your transfer appliance.
2. Package and ship the transfer appliance to Oracle.
Post shipment tasks
1. Optionally, cancel a transfer appliance if you don't want Oracle to upload your data.
2. Monitor your transfer appliance return shipment.
3. Review transfer appliance log files.
4. Close the transfer job.
Secure Appliance Data Transfer to Oracle Cloud Infrastructure


two types of transfer utility

1. Data transfer appliance
2. Data transfer Disk--disks is being purchased by customer. These are feasible for transferring relatively small amount of data.


DNS Zones:-global in nature

Zone file uploads are limited to 1
megabyte (MB) in size per zone file. If your zone file is larger than 1 MB, you will need to split
the zone file into smaller batches to upload all of the zone information

DNS Resource Record Types
A
An address record used to point a hostname to an IPv4 address. For more information
about A records, see RFC 1035.
AAAA
An address record used point a hostname at an IPv6 address. For more information about
AAAA records, see RFC 3596.
ALIAS
A private pseudo-record that allows CNAME functionality at the apex of a zone. You can
view and read ALIAS records in Oracle Cloud Infrastructure DNS, but you cannot create
them.
CHAPTER 10 Edge Services
Oracle Cloud Infrastructure User Guide 1230
CAA
A Certification Authority Authorization record allows a domain name holder to specify one
or more Certification Authorities authorized to issue certificates for that domain. For more
information about CAA records, see RFC 6844.
CDNSKEY
A Child DNSKEY moves a CDNSSEC key from a child zone to a parent zone. The
information provided in this record must match the CDNSKEY information for your domain
at your other DNS provider. This record is automatically created if you enable DNSSEC on
a primary zone in Oracle Cloud Infrastructure DNS


CDS
A Child Delegation Signer record is a child copy of a DS record, for transfer to a parent
zone. For more information about CDS records, see RFC 7344.
CERT
A Certificate record stores public key certificates and related certificate revocation lists in
the DNS. For more information about CERT records, see RFC 2538 and RFC 4398.
CNAME
A Canonical Name record identifies the canonical name for a domain. For more
information about CNAME records
CSYNC
A Child-to-Parent Synchronization record syncs records from a child zone to a parent
zone. For more information about CNAME records, see RFC 7477.
DHCID
A DHCP identifier record provides a way to store DHCP client identifiers in the DNS to
eliminate potential hostname conflicts within a zone


IPSec connection:-

Overall Process
Here's the overall process for setting up an IPSec VPN:

Complete the tasks listed in Before You Get Started.
Set up the IPSec VPN components (instructions in Example: Setting Up a Proof of Concept IPSec VPN):
Create your VCN.
Create a DRG.
Attach the DRG to your VCN.
Create a route table and route rule for the DRG.
Create a security list and required rules.
Create a subnet in the VCN.
Create a CPE object and provide your CPE device's public IP address.
Create an IPSec connection to the CPE object and provide required routing information.

Fast Connect:-
Oracle Provider
List of Oracle Cloud Infrastructure FastConnect providers
Port speeds in 1-Gbps and 10-Gbps increments
Instructions for integrating: FastConnect: With an Oracle Provider
Third-Party Provider
Port speed of 10 Gbps per cross-connect
Instructions for integrating: FastConnect: With a Third-Party Provider
Colocation with Oracle in an Oracle Cloud Infrastructure FastConnect Location
List of Oracle Cloud InfrastructureFastConnect locations (see the FAQ for specific addresses)
Port speed of 10 Gbps per cross-connect

autonomous database

These services map to the LOW, MEDIUM, and HIGH consumer groups. For example, if you provision an Autonomous Data Warehouse service with the name ADW1, your service names are:

adw1_high

adw1_medium

adw1_low

For example, a user connecting with the adw1_low service uses the consumer group LOW.

The basic characteristics of these consumer groups are:

HIGH: Highest resources, lowest concurrency. Queries run in parallel.

MEDIUM: Less resources, higher concurrency. Queries run in parallel.

LOW: Least resources, highest concurrency. Queries run serially.


Autonomous Data Warehouse has predefined idle time limits for sessions so that idle sessions do not hold system resources for a long time.

A session may be terminated if it stays idle for more than five (5) minutes and the resources it consumes are needed by other users. This allows other active sessions to proceed without waiting for the idle session.

Concurrency

The concurrency level of these consumer groups changes based on the number of OCPUs you subscribe to. The HIGH consumer group’s concurrency is fixed and does not change based on the number of OCPUs. The MEDIUM and LOW consumer groups can run more concurrent SQL statements if you scale up the compute capacity of your service.

Note:

The HIGH consumer group is configured for low concurrency, even a single query in this consumer group can use all resources in your database. If your workload has concurrent queries Oracle recommends using the MEDIUM consumer group. If your concurrency requirements are not met with the MEDIUM consumer group, you can use the LOW consumer group or you can scale up your compute capacity and continue using the MEDIUM consumer group.
For example, for an Autonomous Data Warehouse with 16 OCPUs, the HIGH consumer group will be able to run 3 concurrent SQL statements when the MEDIUM consumer group is not running any statements. The MEDIUM consumer group will be able to run 20 concurrent SQL statements when the HIGH consumer group is not running any statements. The LOW consumer group will be able to run 1600 concurrent SQL statements. The HIGH consumer group can run at least 1 SQL statement when the MEDIUM consumer group is also running statements. When these concurrency levels are reached for a consumer group new SQL statements in that consumer group will be queued until one or more running statements finish.


If you want to start using the Autonomous Data Warehouse service without creating your own tables, the service provides the read-only Sales History and Star Schema Benchmark data sets. These data sets are provided as Oracle Database schemas SH and SSB, respectively


Concurrency is dependent on OCPU only in medium and low consumer groups


Predefined Database Service Names for Autonomous Transaction Processing
The tnsnames.ora file provided with the credentials zip file contains five database service names identifiable as tpurgent, tp, high, medium, and low. The predefined service names provide different levels of performance and concurrency for Autonomous Transaction Processing.

tpurgent: The highest priority application connection service for time critical transaction processing operations. This connection service supports manual parallelism.

tp: A typical application connection service for transaction processing operations. This connection service does not run with parallelism.

high: A high priority application connection service for reporting and batch operations. All operations run in parallel and are subject to queuing.

medium: A typical application connection service for reporting and batch operations. All operations run in parallel and are subject to queuing. Using this service the degree of parallelism is limited to four (4).

low: A lowest priority application connection service for reporting or batch processing operations. This connection service does not run with parallelism


File Storage:-

AD local specific. Load balancer is not. for same subnet IAM plicies control the mounting of target.

Zone:-

A zone is a portion of the DNS namespace. A Start of Authority record (SOA) defines a zone. A zone contains all labels underneath itself in the tree, unless otherwise specified. Child zones are independent subdomains with their own Start of Authority and Name Server (NS) records. The parent zone of a child zone must contain NS records that refer DNS queries to the name servers responsible for the child zone. Each subsequent child zone creates another link in the delegation chain


fast connect

private fast connect extends your on premise private networks to oracle cloud.
public fast connect enables us to access oci resoures without using the internet

public fast connect dosen't use DRG.

Remote vcn peering uses drg

high level steps

1. setup the drg and attach it to the vcn
2. update rules in the existing vcn
3. set up cross connects groups

Oracle provides three components to help you implement highly available connections:

Multiple Oracle FastConnect locations within each region (data center redundancy)
Multiple providers in each Oracle FastConnect location (provider redundancy)
Multiple physical circuits in each Oracle FastConnect location (circuit redundancy)


And once you pass the exam, feel free to transfer $1 to my account.:).Just kidding
All the best.


Thanks...............................


Sunday, November 18, 2018

Installing OEM 13c and deployment of targets on Oracle Enterprise Linux


This is a step by step document of installing OEM 13c Release 2 and how to deploy targets in Linux environment.

Note:Oracle Database 12.1.0.2 is already installed, the steps for which are not covered here.


Download OEM 13c from edelivery website https://edelivery.oracle.com


Unzip the files.


[oracle@oem13c oem_binaries]$ chmod u+x em13200_linux64.bin


[oracle@oem13c oem_binaries]$ ./em13200_linux64.bin
** The directory "/tmp" does not have enough space. At least 10241 MB of free space are required.
Please input another directory or [Exit]: /u01/oem/oracle/tmp
0%................................................................./u01/oem/oracle/tmp/sfx_jhKt1s/Disk5/stage/Components/

....100%
Launcher log file is /u01/oem/oracle/tmp/OraInstall2018-09-20_09-30-47PM/launcher2018-09-20_09-30-47PM.log.
Starting Oracle Universal Installer

Checking if CPU speed is above 300 MHz.   Actual 2266.441 MHz    Passed
Checking monitor: must be configured to display at least 256 colors.   Actual 16777216    Passed
Checking swap space: must be greater than 512 MB.   Actual 8799 MB    Passed
Checking if this platform requires a 64-bit JVM.   Actual 64    Passed (64-bit not required)


Preparing to launch the Oracle Universal Installer from /u01/oem/oracle/tmp/OraInstall2018-09-20_09-30-47PM
====Prereq Config Location main===
/u01/oem/oracle/tmp/OraInstall2018-09-20_09-30-47PM/stage/prereq
EMGCInstaller args -scratchPath
EMGCInstaller args /u01/oem/oracle/tmp/OraInstall2018-09-20_09-30-47PM
EMGCInstaller args -sourceType
EMGCInstaller args network
EMGCInstaller args -timestamp
EMGCInstaller args 2018-09-20_09-30-47PM
EMGCInstaller args -paramFile
EMGCInstaller args /u01/oem/oracle/tmp/sfx_jhKt1s/Disk1/install/linux64/oraparam.ini
EMGCInstaller args -nocleanUpOnExit
DiskLoc inside SourceLoc/u01/oem/oem_binaries
EMFileLoc:/u01/oem/oracle/tmp/OraInstall2018-09-20_09-30-47PM/oui/em/
ScratchPathValue :/u01/oem/oracle/tmp/OraInstall2018-09-20_09-30-47PM


[root@oem13c middleware]# pwd

/u01/oem/oracle/middleware
[root@oem13c middleware]# sh allroot.sh

Starting to execute allroot.sh .........

Starting to execute /u01/oem/oracle/middleware/root.sh ......
/etc exist

Creating /etc/oragchomelist file...
/u01/oem/oracle/middleware
Finished product-specific root actions.
/etc exist
Finished execution of  /u01/oem/oracle/middleware/root.sh ......


Starting to execute /u01/oem/oracle/agent/agent_13.2.0.0.0/root.sh ......
Finished product-specific root actions.
/etc exist
Finished execution of  /u01/oem/oracle/agent/agent_13.2.0.0.0/root.sh ......
[root@oem13c middleware]#


Login to the OEM url using sysman user


Create the env variable in the OMS host.

[oracle@oem13c oem]$ cat oem.env
export OMS_HOME=/u01/oem/oracle/middleware
export AGENT_HOME=/u01/oem/oracle/agent/agent_inst

[oracle@oem13c oem]$


 Next, we will push the agents to the respective hosts.


Click on "add target manually" as show above in the screenshot.

Next,


Click on install agent on host


Click on "+ Add" button and provide the required session name of your choice


Choose the host which should have the fully qualified name and the specific platform

Note: The host to be added should be reachable from OMS host. Thus before proceeding, check if  you are able to do a telnet

telnet oem13c.localdomain 3872--check if the client server is able to telnet to the oms server
Trying 192.168.56.6...
Connected to oem13c.localdomain (192.168.56.6).
Escape character is '^]'.
^CConnection closed by foreign host.


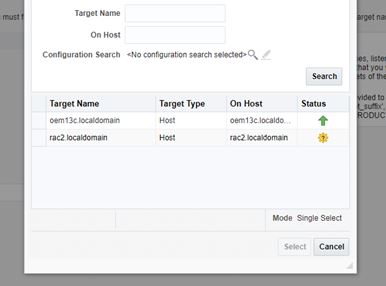
Once the deployment completes, we will be able to see the added host.


Till now, only the host monitoring has been enabled. OEM gives the advantage of adding the different types of targets for monitoring. Here, we have shown only the database monitoring part. 


Click on Add using guided process


Choose the respective host


provide the dbsnmp credentials


As we can see now that database is now available


For adding Oracle E-Business Suite as the target, we need to install the AMP plugins first, for which we need to follow the note:


This concludes installing OEM 13c and deploying targets in OEM. In the further posts, i will cover how to create metrics extensions and how to create incident rules in OEM 13c.


Hope, this post will help someone.


Sunday, October 28, 2018

OEM 13c secure agent is failing with javax.net.ssl.SSLPeerUnverifiedException: peer not authenticated

Today, i was doing the installation of OEM 13c Release 2 and as part of that installing the agent in the new host was error'ed óut with the below


Manually running the secure agent was also failing.

[oracle@rac2 agent]$ cd /u01/oem/oracle/agent/agent_inst/bin
[oracle@rac2 bin]$ ./emctl secure agent
Oracle Enterprise Manager Cloud Control 13c Release 2
Copyright (c) 1996, 2016 Oracle Corporation.  All rights reserved.
Agent is already stopped...   Done.
Securing agent...   Started.
Enter Agent Registration Password :
Securing agent...   Failed.


Thus i checked the secure.log and found the message as "
2018-09-05 08:45:19,938 [main] ERROR agent.SecureAgentCmd main.353 - Failed to secure the Agent:
javax.net.ssl.SSLPeerUnverifiedException: peer not authenticated
        at sun.security.ssl.SSLSessionImpl.getPeerCertificateChain(SSLSessionImpl.java:470)
        at oracle.sysman.emctl.secure.agent.SecureAgentCmd.checkUpload(SecureAgentCmd.java:665)
        at oracle.sysman.emctl.secure.agent.SecureAgentCmd.secureAgent(SecureAgentCmd.java:450)
        at oracle.sysman.emctl.secure.agent.SecureAgentCmd.main(SecureAgentCmd.java:346)
2018-09-05 08:45:19,941 [main] INFO  agent.SecureAgentCmd main.355 - Re-trying. Trials left:0
[05-09-2018 08:45:19] USERINFO ::Securing agent...   Failed.""


Solution:-The time in the client machine as not correct. Changed it using the root user

[root@rac2 agent]# date -s "22:04:00 OCT 27, 2018"
Sat Oct 27 22:04:00 EDT 2018
[root@rac2 agent]# date
Sat Oct 27 22:04:06 EDT 2018


Thereafter Secure agent command got a successful run.


[oracle@rac2 bin]$ ./emctl secure agent
Oracle Enterprise Manager Cloud Control 13c Release 2
Copyright (c) 1996, 2016 Oracle Corporation.  All rights reserved.
Agent is already stopped...   Done.
Securing agent...   Started.
Enter Agent Registration Password :
Securing agent...   Successful.


Hope it helps someone.

Monday, September 17, 2018

Creating Physical Standby Database for Oracle E-Business Suite Release 12.2.7 Using Oracle 12c (12.1.0.2)

This post describes how to configure an Oracle E-Business Suite Release 12.2.x environment to use Oracle Database 12c Release 1 (12.1.0.2) as a physical standby. Also the role transition switchover/Switchback tests have been explained in details. 


Overview:

Standby Database
A standby database is a transactionally consistent copy of the primary database. Using a backup copy of the primary database, you can create up to 30 standby databases and incorporate them in Oracle Data Guard configuration.
There are three types of standby databases:
  • Physical standby Provides a physically identical copy of the primary database, with on-disk database structures that are identical to the primary database on a block-for-block basis. The database schema, including indexes, is the same. A physical standby database is kept synchronized with the primary database by recovering the redo data received from the primary database.
  • Logical standby 
    Contains the same logical information as the primary database, although the physical organization and structure of the data can be different. It is kept synchronized with the primary database by transforming the data in the redo logs received from the primary database into SQL statements and then executing the SQL statements on the standby database.
  • Snapshot standby
    A fully updatable standby database. Like a physical or logical standby database, a snapshot standby database receives and archives redo data from a primary database. Unlike a physical or logical standby database, a snapshot standby database does not apply the redo data that it receives.

Oracle Data Guard
Oracle Data Guard is a set of services that create, manage, and monitor one or more standby databases to enable a primary database to survive disasters and data corruption. If the primary database becomes unavailable due to a planned or an unplanned outage, Oracle Data Guard can switch a standby database to the primary role, minimizing the downtime.
Data Guard offers three modes of data protection:
  • Maximum Protection
    This mode offers the highest level of data protection. Data is synchronously transmitted to the standby database from the primary database, and transactions are not committed on the primary database unless the redo data is available on at least one standby database configured in this mode. If the last standby database configured in this mode becomes unavailable, processing stops on the primary database. This mode guarantees no data loss.
  • Maximum Availability
    This mode is similar to the maximum protection mode, including no data loss. However, if a standby database becomes unavailable (for example, due to network connectivity problems), processing continues on the primary database. When the fault is corrected, the standby database is resynchronized with the primary database. If there is a need to failover before the standby database is resynchronized, some data may be lost.
  • Maximum Performance
    This mode offers slightly less data protection on the primary database, but higher performance than maximum availability mode. In this mode, as the primary database processes transactions, redo data is asynchronously shipped to the standby database. The commit operation on the primary database does not wait for the standby database to acknowledge receipt of redo data before completing write operations on the primary database. If any standby destination becomes unavailable, processing continues on the primary database, and there is little effect on primary database performance.


This is based on the classic/traditional architecture of an Oracle E-Business Suite 12.2 Data Guard configuration, where the systems are replicated across the primary and standby sites and primary application tier is connected with primary database and standby application tier is connected with standby database as seen in the diagram below:


Now lets jump to the steps.


Enable Forced Logging
To protect against unlogged direct writes in the primary database that cannot be propagated to the standby database, turn on FORCE LOGGING at the primary database before performing data file backups that will be used to create the standby database.
Use the following SQL command to set FORCE LOGGING on the primary database:

Connected to:
Oracle Database 12c Enterprise Edition Release 12.1.0.2.0 - 64bit Production
With the Partitioning, OLAP, Advanced Analytics and Real Application Testing options

SQL> ALTER DATABASE FORCE LOGGING;

Database altered.


Configure Oracle Net Communication To/From Standby System
PROD-Primary Server              Host-rac2.localdomain
PRODDR-Standby server         Host-dr.localdomain

In the standby server

Create a static listener which will be used in active duplication.

listener.ora

SID_LIST_LISTENER =
  (SID_LIST =
    (SID_DESC =
      (SID_NAME = PROD)
      (ORACLE_HOME = /u01/database/oracledb/product/12c/db_1)
    )
  )


LISTENER =
  (DESCRIPTION_LIST =
    (DESCRIPTION =
      (ADDRESS = (PROTOCOL = TCP)(HOST =dr.localdomain )(PORT = 1521))
    )
  )

ADR_BASE_LISTENER= /u01/database/oracledb/diag

cat tnsnames.ora

IFILE=/u01/database/oracledb/product/12c/db_1/network/admin/PRODDR_rac2_ifile.ora

[oracle@dr admin]$

[oracle@dr admin]$ cat PRODDR_rac2_ifile.ora
PRODDR=
        (DESCRIPTION=
                (ADDRESS=(PROTOCOL=tcp)(HOST=dr.localdomain)(PORT=1521))
            (CONNECT_DATA=
                (SERVICE_NAME=PROD)
                (SERVER=DEDICATED)
            )
        )

PROD=
        (DESCRIPTION=
                (ADDRESS=(PROTOCOL=tcp)(HOST=rac2.localdomain)(PORT=1521))
            (CONNECT_DATA=
                (SERVICE_NAME=PROD)
                (INSTANCE_NAME=PROD)
            )
        )
[oracle@dr admin]


Now set the environment file.

[oracle@dr database]$ cat database.env
export ORACLE_SID=PROD
export ORACLE_HOME=/u01/database/oracledb/product/12c/db_1
export PATH=$PATH:/u01/database/oracledb/product/12c/db_1/bin


start the listener now

lsnrctl start

LSNRCTL for Linux: Version 12.1.0.2.0 - Production on 02-SEP-2018 11:47:38

Copyright (c) 1991, 2014, Oracle.  All rights reserved.

Starting /u01/database/oracledb/product/12c/db_1/bin/tnslsnr: please wait...

TNSLSNR for Linux: Version 12.1.0.2.0 - Production
System parameter file is /u01/database/oracledb/product/12c/db_1/network/admin/listener.ora
Log messages written to /u01/database/oracledb/diag/diag/tnslsnr/dr/listener/alert/log.xml
Listening on: (DESCRIPTION=(ADDRESS=(PROTOCOL=tcp)(HOST=dr.localdomain)(PORT=1521)))

Connecting to (DESCRIPTION=(ADDRESS=(PROTOCOL=TCP)(HOST=dr.localdomain)(PORT=1521)))
STATUS of the LISTENER
------------------------
Alias                     LISTENER
Version                   TNSLSNR for Linux: Version 12.1.0.2.0 - Production
Start Date                02-SEP-2018 11:47:40
Uptime                    0 days 0 hr. 0 min. 1 sec
Trace Level               off
Security                  ON: Local OS Authentication
SNMP                      OFF
Listener Parameter File   /u01/database/oracledb/product/12c/db_1/network/admin/listener.ora
Listener Log File         /u01/database/oracledb/diag/diag/tnslsnr/dr/listener/alert/log.xml
Listening Endpoints Summary...
  (DESCRIPTION=(ADDRESS=(PROTOCOL=tcp)(HOST=dr.localdomain)(PORT=1521)))
Services Summary...
Service "PROD" has 1 instance(s).
  Instance "PROD", status UNKNOWN, has 1 handler(s) for this service...
The command completed successfully


tnsping PRODDR

TNS Ping Utility for Linux: Version 12.1.0.2.0 - Production on 02-SEP-2018 12:07:14

Copyright (c) 1997, 2014, Oracle.  All rights reserved.

Used parameter files:


Used TNSNAMES adapter to resolve the alias
Attempting to contact (DESCRIPTION= (ADDRESS=(PROTOCOL=tcp)(HOST=dr.localdomain)(PORT=1521)) (CONNECT_DATA= (SERVICE_NAME=PROD) (SERVER=DEDICATED)))
OK (0 msec)


In the primary server

go to $TNS_ADMIN

under the sqlnet_ifile.ora

add the below

NAMES.DIRECTORY_PATH=(TNSNAMES, ONAMES, HOSTNAME)
SQLNET.EXPIRE_TIME= 10
tcp.validnode_checking =no
tcp.invited_nodes=(dr.localdomain)
SQLNET.INBOUND_CONNECT_TIMEOUT =60
SQLNET.ALLOWED_LOGON_VERSION_SERVER=8


Create the context ifile and add the below

PRODDR=
        (DESCRIPTION=
                (ADDRESS=(PROTOCOL=tcp)(HOST=dr.localdomain)(PORT=1521))
            (CONNECT_DATA=
                (SERVICE_NAME=PROD)
                (SERVER=DEDICATED)
            )
        )

PROD=
        (DESCRIPTION=
                (ADDRESS=(PROTOCOL=tcp)(HOST=rac2.localdomain)(PORT=1521))
            (CONNECT_DATA=
                (SERVICE_NAME=PROD)
                (INSTANCE_NAME=PROD)
            )
        )


Test the tnsping from both the nodes.


Set Primary Database Initialization Parameters

In the standby 

Created a temporary init file and started the db in no mount.
[oracle@dr dbs]$ cat initPRODDR.ora
DB_NAME=PROD
DB_UNIQUE_NAME=PRODDR
DB_BLOCK_SIZE=8192

and start the dr server in nomount
[oracle@dr dbs]$ sqlplus / as sysdba

SQL*Plus: Release 12.1.0.2.0 Production on Sun Sep 2 14:47:12 2018

Copyright (c) 1982, 2014, Oracle.  All rights reserved.

Connected to an idle instance.

SQL> startup nomount pfile='/u01/database/oracledb/product/12c/db_1/dbs/initPRODDR.ora';
ORACLE instance started.

Total System Global Area  218103808 bytes
Fixed Size                  2922712 bytes
Variable Size             159385384 bytes
Database Buffers           50331648 bytes
Redo Buffers                5464064 bytes
SQL> exit;


Set Up Secure Connections

orapwd file=orapwPROD password=pwd entries=10 ignorecase=y

Copy the same to the standby server.

Enable Archive Logging on Primary System
In my case my primary was already archive enabled

Add Standby Redo Logs


SQL> select bytes/1024/1024 as MB from v$log;

        MB
----------
      1000
      1000
Now add the standby redo logs
estimate the number of redo logs
SQL> select GROUP#,MEMBER from v$logfile;

    GROUP#
----------
MEMBER
--------------------------------------------------------------------------------
         2
/u01/database/PROD/data/log02a.dbf

         2
/u01/database/PROD/data/log02b.dbf

         1
/u01/database/PROD/data/log01a.dbf


    GROUP#
----------
MEMBER
--------------------------------------------------------------------------------
         1
/u01/database/PROD/data/log01b.dbf

now add the standby logs

SQL> ALTER DATABASE ADD STANDBY LOGFILE GROUP 3 '/u01/database/PROD/data/log03a.dbf' size 1000M;

Database altered.

SQL> ALTER DATABASE ADD STANDBY LOGFILE GROUP 4 '/u01/database/PROD/data/log04.dbf' size 1000M;

Database altered.


Create a physical standby using active duplication method

Add the below parameters to the existing init file in the primary server
*.fal_server='PROD'
*.log_archive_config='dg_config=(PROD,PRODDR)'
*.log_archive_dest_2='service=PRODDR ASYNC valid_for=(ONLINE_LOGFILE,PRIMARY_ROLE) db_unique_name=PRODDR'


Ensure the primary server is started with a spfile.

In  primary server:

Create rman duplicate script

run {
 allocate channel pri1 type disk;
 allocate auxiliary channel stby type disk;
 duplicate target database
  for standby
  from active database
  dorecover
  spfile
    set db_unique_name='PRODDR'
    set control_files= ' /u01/database/oracledb/data/cntrl01.dbf',' /u01/database/oracledb/data /cntrl02.dbf',' /u01/database/oracledb/data /cntrl03.dbf'
    set fal_server='PROD'
    set standby_file_management='AUTO'
    set log_archive_config='dg_config=(PROD,PRODDR)'
    set log_archive_dest_1='LOCATION= /u01/database/oracledb/data/ VALID_FOR=(ALL_LOGFILES,ALL_ROLES) DB_UNIQUE_NAME=PRODDR'
    set log_archive_dest_2='service=PRODDR ASYNC valid_for=(ONLINE_LOGFILE,PRIMARY_ROLE) db_unique_name=PRODDR'
set log_file_name_convert=' /u01/database/PROD/data/',' /u01/database/oracledb /data/'
set  db_file_name_convert=' /u01/database/PROD/data/',' /u01/database/oracledb/data/'
nofilenamecheck;
  }


Now issue the rman duplicate session

rman target sys/pwd@PROD auxiliary sys/pwd@PRODDR

Recovery Manager: Release 12.1.0.2.0 - Production on Sun Sep 2 14:52:02 2018

Copyright (c) 1982, 2014, Oracle and/or its affiliates.  All rights reserved.

connected to target database: PROD (DBID=391996181)
connected to auxiliary database: PROD (not mounted)

RMAN>@duplicate.rmn


This completes the creation of physical standby database PRODDR and it will be in mount state.


Now in the standby server, start the mrp process
SQL> alter database recover managed standby database disconnect from session;

Database altered.

In Primary server
verify the parameter
SQL> show parameter log_archive_dest_state_2;

NAME                                 TYPE        VALUE
------------------------------------ ----------- ------------------------------
log_archive_dest_state_2             string      enable


In the standby server

SQL> SELECT 'Last Applied : ' Logs,
TO_CHAR(next_time,'DD-MON-YY:HH24:MI:SS') TIME,thread#,sequence#
FROM v$archived_log
WHERE sequence# =
(SELECT MAX(sequence#) FROM v$archived_log WHERE applied='YES'
)
UNION
SELECT 'Last Received : ' Logs,
TO_CHAR(next_time,'DD-MON-YY:HH24:MI:SS') TIME,thread#,sequence#
FROM v$archived_log
WHERE sequence# =(SELECT MAX(sequence#) FROM v$archived_log );
  2    3    4    5    6    7    8    9   10   11
LOGS             TIME                  THREAD#  SEQUENCE#
---------------- ------------------ ---------- ----------
Last Applied :   03-SEP-18:09:38:45          1         67
Last Received :  03-SEP-18:09:38:45          1         67


In the primary server

> archive log list;
Database log mode              Archive Mode
Automatic archival             Enabled
Archive destination            /u01/database/PROD/data
Oldest online log sequence     67
Next log sequence to archive   68
Current log sequence           68


Thus we can see from above that the archive logs are being shipped from primary server to standby server.

*************************************Configuration : Standby Application Tier(s) Connected to the Standby Database******************

run adpreclone in the run file system of the application tier.
[applmgr@rac2 scripts]$ perl adpreclone.pl appsTier

                     Copyright (c) 2011, 2014 Oracle Corporation
                        Redwood Shores, California, USA

                        Oracle E-Business Suite Rapid Clone

                                 Version 12.2

                      adpreclone Version 120.31.12020000.22

Enter the APPS User Password:
Enter the Weblogic AdminServer password :

 Checking the status of the Oracle WebLogic Administration Server....

 Running perl /u01/application/PROD/fs1/EBSapps/appl/ad/12.0.0/patch/115/bin/adProvisionEBS.pl ebs-get-serverstatus -contextfile=/u01/application/PROD/fs1/inst/apps/PROD_rac2/appl/admin/PROD_rac2.xml -servername=AdminServer -promptmsg=hide

The Oracle WebLogic Administration Server is up.

Running:
perl /u01/application/PROD/fs1/EBSapps/appl/ad/12.0.0/bin/adclone.pl java=/u01/application/PROD/fs1/EBSapps/comn/util/jdk64 mode=stage stage=/u01/application/PROD/fs1/EBSapps/comn/clone component=appsTier method= appctx=/u01/application/PROD/fs1/inst/apps/PROD_rac2/appl/admin/PROD_rac2.xml showProgress


 Setting the wls environment

Beginning application tier Stage - Mon Sep  3 10:25:56 2018

/u01/application/PROD/fs1/EBSapps/comn/util/jdk64/bin/java -Xmx600M -DCONTEXT_VALIDATED=false -Doracle.installer.oui_loc=/oui -classpath /u01/application/PROD/fs1/FMW_Home/webtier/lib/xmlparserv2.jar:/u01/application/PROD/fs1/FMW_Home/webtier/jdbc/lib/ojdbc6.jar:/u01/application/PROD/fs1/EBSapps/comn/java/classes:/u01/application/PROD/fs1/FMW_Home/webtier/oui/jlib/OraInstaller.jar:/u01/application/PROD/fs1/FMW_Home/webtier/oui/jlib/ewt3.jar:/u01/application/PROD/fs1/FMW_Home/webtier/oui/jlib/share.jar:/u01/application/PROD/fs1/FMW_Home/webtier/../Oracle_EBS-app1/oui/jlib/srvm.jar:/u01/application/PROD/fs1/FMW_Home/webtier/jlib/ojmisc.jar:/u01/application/PROD/fs1/FMW_Home/wlserver_10.3/server/lib/weblogic.jar:/u01/application/PROD/fs1/FMW_Home/oracle_common/jlib/obfuscatepassword.jar  oracle.apps.ad.clone.StageAppsTier -e /u01/application/PROD/fs1/inst/apps/PROD_rac2/appl/admin/PROD_rac2.xml -stage /u01/application/PROD/fs1/EBSapps/comn/clone -tmp /tmp -method CUSTOM   -showProgress -nopromptmsg

Log file located at /u01/application/PROD/fs1/inst/apps/PROD_rac2/admin/log/clone/StageAppsTier_09031025.log

  \     20% completed

Completed Stage...
Mon Sep  3 10:52:41 2018


As, run file system points to fs1, so we have created the directories fs1 and fs2 in dr and will copy the EBSapps directory from run file system of the primary to dr fs1.


Now create the appsutil directory in the dr server.

In the primary application server

[applmgr@rac2 PROD]$ perl $AD_TOP/bin/admkappsutil.pl
Starting the generation of appsutil.zip
Log file located at /u01/application/PROD/fs1/inst/apps/PROD_rac2/admin/log/Make                                                                                        AppsUtil_09032132.log
output located at /u01/application/PROD/fs1/inst/apps/PROD_rac2/admin/out/appsut                                                                                        il.zip
MakeAppsUtil completed successfully.


[applmgr@rac2 PROD]$ scp /u01/application/PROD/fs1/inst/apps/PROD_rac2/admin/out/appsutil.zip oracle@192.168.X.X:/u01/database/oracledb/product/12c/db_1
oracle@192.168.X.X's password:
appsutil.zip                                                                                                                          100% 3685KB   3.6MB/s   00:00
[applmgr@rac2 PROD]$

in the dr server
[oracle@dr db_1]$ unzip -o appsutil.zip
Archive:  appsutil.zip
   creating: appsutil/
thus appsutil directory is now created.


Now before creating the context file, we should convert the database to snapshot standby.
SQL> alter system set db_recovery_file_dest_size=32g scope=both;

System altered.

SQL> alter system set db_recovery_file_dest='/u01/database/flas_recovery_area' scope=both;

System altered.

SQL> alter system set db_flashback_retention_target=1440 scope=both;

System altered.
Stop redo apply on the physical standby database:
SQL> alter database recover managed standby database cancel;

Database altered.

Turn on flashback logging:
SQL> alter database flashback on;


Database altered.

Convert the standby database into a snapshot standby database:

SQL> alter database convert to snapshot standby;

Database altered.

SQL>
SQL> shut immediate;
ORA-01109: database not open


Database dismounted.
ORACLE instance shut down.
SQL> startup;
ORA-32004: obsolete or deprecated parameter(s) specified for RDBMS instance
ORACLE instance started.

Total System Global Area 2147483648 bytes
Fixed Size                  2926472 bytes
Variable Size             452987000 bytes
Database Buffers         1677721600 bytes
Redo Buffers               13848576 bytes
Database mounted.
Database opened.
remove the application config info

SQL*Plus: Release 12.1.0.2.0 Production on Mon Sep 3 21:55:00 2018

Copyright (c) 1982, 2014, Oracle.  All rights reserved.

Last Successful login time: Mon Sep 03 2018 10:25:27 -04:00

Connected to:
Oracle Database 12c Enterprise Edition Release 12.1.0.2.0 - 64bit Production
With the Partitioning, OLAP, Advanced Analytics and Real Application Testing options

SQL> exec fnd_conc_clone.setup_clean;

PL/SQL procedure successfully completed.

SQL> exec ad_zd_fixer.clear_valid_nodes_info;

PL/SQL procedure successfully completed.

SQL> commit;

Commit complete.

SQL>


now create the context file. before that Copy the jre from primary database server $ORACLE_HOME/appsutil/jre

[oracle@dr bin]$ perl adbldxml.pl appsuser=apps appspass=welcome123 template=$ORACLE_HOME/appsutil/template/adxdbctx.tmp out=$ORACLE_HOME/appsutil/PROD_dr.xml

Starting context file generation for db tier..
Using JVM from /u01/database/oracledb/product/12c/db_1/appsutil/jre/bin/java to execute java programs..

The log file for this adbldxml session is located at:
/u01/database/oracledb/product/12c/db_1/appsutil/log/adbldxml_09032214.log
AC-20010: Error: File - listener.ora could not be found at the location:
        /u01/app/oracledb/product/12c/db_1/network/admin/listener.ora
indicated by TNS_ADMIN. Context file can not be generated.

Could not Connect to the Database with the above parameters, Please answer the Questions below


Enter Hostname of Database server: dr

Enter Port of Database server: 1521

Enter SID of Database server: PROD

Enter Database Service Name: PROD

Enter the value for Display Variable: dr:1.0

The context file has been created at:
/u01/database/oracledb/product/12c/db_1/appsutil/PROD_dr.xml


run autoconfig now:

[oracle@dr PROD_dr]$ sh adautocfg.sh
Enter the APPS user password:
The log file for this session is located at: /u01/database/oracledb/product/12c/db_1/appsutil/log/PROD_dr/09032312/adconfig.log

AutoConfig is configuring the Database environment...

AutoConfig will consider the custom templates if present.
        Using ORACLE_HOME location : /u01/database/oracledb/product/12c/db_1
        Classpath                   : :/u01/database/oracledb/product/12c/db_1/jdbc/lib/ojdbc6.jar:/u01/database/oracledb/product/12c/db_1/appsutil/java/xmlparserv2.jar:/u01/database/oracledb/product/12c/db_1/appsutil/java:/u01/database/oracledb/product/12c/db_1/jlib/netcfg.jar:/u01/database/oracledb/product/12c/db_1/jlib/ldapjclnt12.jar

        Using Context file          : /u01/database/oracledb/product/12c/db_1/appsutil/PROD_dr.xml

Context Value Management will now update the Context file

        Updating Context file...COMPLETED

        Attempting upload of Context file and templates to database...COMPLETED

Updating rdbms version in Context file to db121
Updating rdbms type in Context file to 64 bits
Configuring templates from ORACLE_HOME ...

AutoConfig completed successfully.


Now configure the application tier
[applmgr@dr bin]$ perl adcfgclone.pl appsTier dualfs

                     Copyright (c) 2002, 2015 Oracle Corporation
                        Redwood Shores, California, USA

                        Oracle E-Business Suite Rapid Clone

                                 Version 12.2

                      adcfgclone Version 120.63.12020000.60

Enter the APPS password :

Enter the Weblogic AdminServer password :

Do you want to add a node (yes/no) [no] : no


Running: Context clone...

Log file located at /u01/application/fs1/EBSapps/comn/clone/bin/CloneContext_0904023938.log

Provide the values required for creation of the new APPL_TOP Context file.

Target System Hostname (virtual or normal) [dr] :

Target System Database SID : PROD

Target System Database Server Node [dr] :

Target System Database Domain Name [localdomain] :

Target System Base Directory : /u01/application

Target System Base Directory set to /u01/application

Target System Current File System Base set to /u01/application/fs1

Target System Other File System Base set to /u01/application/fs2

Target System Fusion Middleware Home set to /u01/application/fs1/FMW_Home
Target System Other File System Fusion Middleware Home set to /u01/application/fs2/FMW_Home

Target System Web Oracle Home set to /u01/application/fs1/FMW_Home/webtier
Target System Other File System Web Oracle Home set to /u01/application/fs2/FMW_Home/webtier

Target System Appl TOP set to /u01/application/fs1/EBSapps/appl
Target System Other File System Appl TOP set to /u01/application/fs2/EBSapps/appl

Target System COMMON TOP set to /u01/application/fs1/EBSapps/comn
Target System Other File System COMMON TOP set to /u01/application/fs2/EBSapps/comn

Target System Instance Home Directory [/u01/application] :

Target System Current File System Instance Top set to /u01/application/fs1/inst/apps/PROD_dr

Do you want to preserve the Display [rac2:0.0] (y/n)  : n

Target System Display [dr:0.0] :

Target System Root Service [enabled] :

Target System Web Entry Point Services [enabled] :

Target System Web Application Services [enabled] :

Target System Batch Processing Services [enabled] :

Target System Other Services [disabled] :

Do you want the target system to have the same port values as the source system (y/n) [y] ? : n

Target System Port Pool [0-99] : 1

Checking the port pool 1
done: Port Pool 1 is free
Report file located at /u01/application/fs1/inst/apps/PROD_dr/admin/out/portpool.lst
RC-40201: Unable to connect to Database PROD.

Enter the Database listener port [1522] : 1521

UTL_FILE_DIR on database tier consists of the following directories.

1. /usr/tmp
2. /usr/tmp
3. /u01/database/PROD/12.1.0/appsutil/outbound/PROD_rac2
4. /usr/tmp
Choose a value which will be set as APPLPTMP value on the target node [1] : 1
The new APPL_TOP context file has been created :
  /u01/application/fs1/inst/apps/PROD_dr/appl/admin/PROD_dr.xml
Check Clone Context logfile /u01/application/fs1/EBSapps/comn/clone/bin/CloneContext_0904023938.log for details.

Creating Patch file system context file.....

Log file located at /u01/application/fs1/EBSapps/comn/clone/bin/CloneContextPatch_0904024546.log

Target System Other File System Instance Top set to /u01/application/fs2/inst/apps/PROD_dr

Target System Port Pool [0-99] : 2

Checking the port pool 2
done: Port Pool 2 is free
Report file located at /u01/application/fs2/inst/apps/PROD_dr/admin/out/portpool.lst
The new APPL_TOP context file has been created :
  /u01/application/fs2/inst/apps/PROD_dr/appl/admin/PROD_dr.xml
Check Clone Context logfile /u01/application/fs1/EBSapps/comn/clone/bin/CloneContextPatch_0904024546.log for details.

FMW Pre-requisite check log file location : /u01/application/fs1/EBSapps/comn/clone/FMW/logs/prereqcheck.log
Running: FMW pre-req check...

Configuring: Run file system....
LogFile located at /u01/application/fs1/inst/apps/PROD_dr/admin/log/clone/run/RCloneApplyAppstier_09040246.log
Configuring: Patch file system....
LogFile located at /u01/application/fs1/inst/apps/PROD_dr/admin/log/clone/patch/RCloneApplyAppstier_09040359.log


Do you want to startup the Application Services for PROD? (y/n) [n] : n

Services not started

this completes configuring apps tier configuration in dr server.


Revert the Physical Standby Database to its Original State

Change the standby database from snapshot mode back into standby mode using the following commands:
Copyright (c) 1982, 2014, Oracle.  All rights reserved.


Connected to:
Oracle Database 12c Enterprise Edition Release 12.1.0.2.0 - 64bit Production
With the Partitioning, OLAP, Advanced Analytics and Real Application Testing opt                                                                                        ions

SQL> startup mount force;
ORA-32004: obsolete or deprecated parameter(s) specified for RDBMS instance
ORACLE instance started.

Total System Global Area 2147483648 bytes
Fixed Size                  2926472 bytes
Variable Size             486541432 bytes
Database Buffers         1644167168 bytes
Redo Buffers               13848576 bytes
Database mounted.
SQL> alter database convert to physical standby;

Database altered.

SQL> shutdown immediate;
ORA-01109: database not open


Database dismounted.
ORACLE instance shut down.
SQL> startup nomount;
ORA-32004: obsolete or deprecated parameter(s) specified for RDBMS instance
ORACLE instance started.

Total System Global Area 2147483648 bytes
Fixed Size                  2926472 bytes
Variable Size             486541432 bytes
Database Buffers         1644167168 bytes
Redo Buffers               13848576 bytes
SQL> alter database mount standby database;

Database altered.

SQL>

enable redo log apply
SQL> alter database recover managed standby database using current logfile disconnect;

Database altered.


Performing role transitions

I have illustrated the switchover and switchback steps. If you are familiar with these steps, then failover can also be done easily which is not in the scope of this post.

Prepare for a switchover to the standby server

  1. Verify the primary database instance is open and the standby database instance is mounted.
     
  2. Shut down all the application tier services on all nodes on the primary site.
    $ adstpall.sh <appsuser>/<appspass>
  3. Verify there are no active users connected to the database. Shut down all the sessions on the primary database.
  4. Use the following command on both the primary and standby databases to ensure that the last redo data transmitted from the primary database has been applied on the standby database. If necessary, perform a log file switch before proceeding further:.
    SQL>select sequence#,applied from v$archived_log;

Check whether the primary is ready for a switch. Query the switchover_status column of the v$database fixed view to determine whether the database is ready to switch modes

SQL> select switchover_status from v$database;

SWITCHOVER_STATUS
--------------------

TO STANDBY


 Initiate a switchover on the primary database

Connect as sysdba and issue the following SQL command:

SQL> alter database commit to switchover to physical standby with session shutdown;

Database altered.
When this statement has completed, the primary database will have been converted to a standby database. During the statement's execution, the current control file is backed up to the current SQL session's trace file - this makes it possible to reconstruct the control file should the need arise.

Shut down and mount the primary database

To complete the transition, the database must be shut down and restarted in a mounted state. Change the value of LOG_ARCHIVE_DEST_STATE_2 to defer, in addition, recovery can be started in preparation for transition.
SQL> shutdown immediate;
ORA-01012: not logged on
SQL> exit;
Disconnected from Oracle Database 12c Enterprise Edition Release 12.1.0.2.0 - 64bit Production
With the Partitioning, OLAP, Advanced Analytics and Real Application Testing options
[oracle@rac2 dbs]$ sqlplus / as sysdba

SQL*Plus: Release 12.1.0.2.0 Production on Tue Sep 4 04:08:40 2018

Copyright (c) 1982, 2014, Oracle.  All rights reserved.

Connected to an idle instance.

SQL>
SQL> startup nomount;
ORACLE instance started.

Total System Global Area 2147483648 bytes
Fixed Size                  2926472 bytes
Variable Size             452987000 bytes
Database Buffers         1677721600 bytes
Redo Buffers               13848576 bytes
SQL> alter database mount standby database;

Database altered.

SQL> alter system set LOG_ARCHIVE_DEST_STATE_2=defer scope=both sid='*';

System altered.

SQL> alter database recover managed standby database disconnect from session;

Database altered.

SQL> exit;
Disconnected from Oracle Database 12c Enterprise Edition Release 12.1.0.2.0 - 64bit Production
With the Partitioning, OLAP, Advanced Analytics and Real Application Testing options
[oracle@rac2 dbs]$ ps -ef|grep mrp
oracle   11858     1  1 04:10 ?        00:00:00 ora_mrp0_PROD
oracle   11865  8370  0 04:10 pts/2    00:00:00 grep mrp
[oracle@rac2 dbs]$


At this point in the switchover, both databases are standby databases.

Verify the switchover status on the standby server

As the ORACLE user on the standby-to-become-the-primary database server, verify that it is ready to switch to the primary:
SQL> select switchover_status from v$database;

SWITCHOVER_STATUS
--------------------
TO PRIMARY


SQL> alter database commit to switchover to primary with session shutdown;

Database altered.


Adjust the network parameters:

In the context ifile.ora change the host name in the primary as well as in the standby database.

cat PROD_rac2_ifile.ora
PRODDR=
        (DESCRIPTION=
                (ADDRESS=(PROTOCOL=tcp)(HOST=rac2.localdomain)(PORT=1521))
            (CONNECT_DATA=
                (SERVICE_NAME=PROD)
                (SERVER=DEDICATED)
            )
        )

PROD=
        (DESCRIPTION=
                (ADDRESS=(PROTOCOL=tcp)(HOST=dr.localdomain)(PORT=1521))
            (CONNECT_DATA=
                (SERVICE_NAME=PROD)
                (INSTANCE_NAME=PROD)
            )
        )


in the new primary server
PRODDR=
        (DESCRIPTION=
                (ADDRESS=(PROTOCOL=tcp)(HOST=rac2.localdomain)(PORT=1521))
            (CONNECT_DATA=
                (SERVICE_NAME=PROD)
                (SERVER=DEDICATED)
            )
        )

PROD=
        (DESCRIPTION=
                (ADDRESS=(PROTOCOL=tcp)(HOST=dr.localdomain)(PORT=1521))
            (CONNECT_DATA=
                (SERVICE_NAME=PROD)
                (INSTANCE_NAME=PROD)
            )


On the current primary, change the LOG_ARCHIVE_DEST_STATE_2 to enable using the following command:

SQL> alter system set LOG_ARCHIVE_DEST_STATE_2=enable scope=both sid='*';

System altered.
To complete the transition, the database must be shut down and re-started:

SQL> shut immediate;
ORA-01109: database not open


Database dismounted.
ORACLE instance shut down.
SQL> startup;
ORA-32004: obsolete or deprecated parameter(s) specified for RDBMS instance
ORACLE instance started.

Total System Global Area 2147483648 bytes
Fixed Size                  2926472 bytes
Variable Size             486541432 bytes
Database Buffers         1644167168 bytes
Redo Buffers               13848576 bytes
Database mounted.
Database opened.


Complete the database configuration

  1. Connect to the new primary database using SQL*Plus as the APPS user, and execute the following commands:
SQL> exec fnd_net_services.remove_system ('PROD');

PL/SQL procedure successfully completed.

SQL> commit;

Commit complete.

SQL> exec fnd_conc_clone.setup_clean;

PL/SQL procedure successfully completed.

SQL> exec ad_zd_fixer.clear_valid_nodes_info;

PL/SQL procedure successfully completed.

SQL>

As the ORACLE user on the new primary database server, use AutoConfig to complete the configuration for the primary operations, providing the APPS password when prompted


[oracle@dr PROD_dr]$ sh adautocfg.sh
Enter the APPS user password:
The log file for this session is located at: /u01/database/oracledb/product/12c/db_1/appsutil/log/PROD_dr/09041329/adconfig.log

AutoConfig is configuring the Database environment...

AutoConfig will consider the custom templates if present.
        Using ORACLE_HOME location : /u01/database/oracledb/product/12c/db_1
        Classpath                   : :/u01/database/oracledb/product/12c/db_1/jdbc/lib/ojdbc6.jar:/u01/database/oracledb/product/12c/db_1/appsutil/java/xmlparserv2.jar:/u01/database/oracledb/product/12c/db_1/appsutil/java:/u01/database/oracledb/product/12c/db_1/jlib/netcfg.jar:/u01/database/oracledb/product/12c/db_1/jlib/ldapjclnt12.jar

        Using Context file          : /u01/database/oracledb/product/12c/db_1/appsutil/PROD_dr.xml

Context Value Management will now update the Context file

        Updating Context file...COMPLETED

        Attempting upload of Context file and templates to database...COMPLETED

Updating rdbms version in Context file to db121
Updating rdbms type in Context file to 64 bits
Configuring templates from ORACLE_HOME ...

AutoConfig completed successfully.

stop and start the listener on the new primary database server:
[oracle@dr database]$ lsnrctl stop PROD

LSNRCTL for Linux: Version 12.1.0.2.0 - Production on 04-SEP-2018 14:11:21

Copyright (c) 1991, 2014, Oracle.  All rights reserved.

Connecting to (DESCRIPTION=(ADDRESS=(PROTOCOL=TCP)(HOST=dr.localdomain)(PORT=1521)))
The command completed successfully
[oracle@dr database]$ lsnrctl start PROD

LSNRCTL for Linux: Version 12.1.0.2.0 - Production on 04-SEP-2018 14:11:27

Copyright (c) 1991, 2014, Oracle.  All rights reserved.

Starting /u01/database/oracledb/product/12c/db_1/bin/tnslsnr: please wait...

TNSLSNR for Linux: Version 12.1.0.2.0 - Production
System parameter file is /u01/database/oracledb/product/12c/db_1/network/admin/listener.ora
Log messages written to /u01/database/oracledb/product/12c/db_1/admin/PROD_dr/diag/tnslsnr/dr/prod/alert/log.xml
Listening on: (DESCRIPTION=(ADDRESS=(PROTOCOL=tcp)(HOST=dr.localdomain)(PORT=1521)))

Connecting to (DESCRIPTION=(ADDRESS=(PROTOCOL=TCP)(HOST=dr.localdomain)(PORT=1521)))
STATUS of the LISTENER
------------------------
Alias                     PROD
Version                   TNSLSNR for Linux: Version 12.1.0.2.0 - Production
Start Date                04-SEP-2018 14:11:27
Uptime                    0 days 0 hr. 0 min. 0 sec
Trace Level               off
Security                  ON: Local OS Authentication
SNMP                      OFF
Listener Parameter File   /u01/database/oracledb/product/12c/db_1/network/admin/listener.ora
Listener Log File         /u01/database/oracledb/product/12c/db_1/admin/PROD_dr/diag/tnslsnr/dr/prod/alert/log.xml
Listening Endpoints Summary...
  (DESCRIPTION=(ADDRESS=(PROTOCOL=tcp)(HOST=dr.localdomain)(PORT=1521)))
Services Summary...
Service "PROD" has 1 instance(s).
  Instance "PROD", status UNKNOWN, has 1 handler(s) for this service...
The command completed successfully
[oracle@dr database]$

On the new standby server, stop and start the listener for the standby services
[oracle@rac2 database]$ lsnrctl stop PROD

LSNRCTL for Linux: Version 12.1.0.2.0 - Production on 04-SEP-2018 06:36:55

Copyright (c) 1991, 2014, Oracle.  All rights reserved.

Connecting to (DESCRIPTION=(ADDRESS=(PROTOCOL=TCP)(HOST=rac2.localdomain)(PORT=1521)))
The command completed successfully
[oracle@rac2 database]$ lsnrctl start PROD

LSNRCTL for Linux: Version 12.1.0.2.0 - Production on 04-SEP-2018 06:37:01

Copyright (c) 1991, 2014, Oracle.  All rights reserved.

Starting /u01/database/PROD/12.1.0/bin/tnslsnr: please wait...

TNSLSNR for Linux: Version 12.1.0.2.0 - Production
System parameter file is /u01/database/PROD/12.1.0/network/admin/PROD_rac2/listener.ora
Log messages written to /u01/database/PROD/12.1.0/admin/PROD_rac2/diag/tnslsnr/rac2/prod/alert/log.xml
Listening on: (DESCRIPTION=(ADDRESS=(PROTOCOL=tcp)(HOST=rac2.localdomain)(PORT=1521)))

Connecting to (DESCRIPTION=(ADDRESS=(PROTOCOL=TCP)(HOST=rac2.localdomain)(PORT=1521)))
STATUS of the LISTENER
------------------------
Alias                     PROD
Version                   TNSLSNR for Linux: Version 12.1.0.2.0 - Production
Start Date                04-SEP-2018 06:37:01
Uptime                    0 days 0 hr. 0 min. 0 sec
Trace Level               off
Security                  ON: Local OS Authentication
SNMP                      OFF
Listener Parameter File   /u01/database/PROD/12.1.0/network/admin/PROD_rac2/listener.ora
Listener Log File         /u01/database/PROD/12.1.0/admin/PROD_rac2/diag/tnslsnr/rac2/prod/alert/log.xml
Listening Endpoints Summary...
  (DESCRIPTION=(ADDRESS=(PROTOCOL=tcp)(HOST=rac2.localdomain)(PORT=1521)))
Services Summary...
Service "PROD" has 1 instance(s).
  Instance "PROD", status UNKNOWN, has 1 handler(s) for this service...
The command completed successfully

Configure the Application Tier After Role Transition (Switchover)

Once the primary database configuration has completed and its listeners have started, log in to each new-primary application tier server as the APPLMGR user, and run the final configuration steps on the run file systems providing the APPS password when prompted::
[applmgr@dr scripts]$ sh adautocfg.sh
Enter the APPS user password:

The log file for this session is located at: /u01/application/fs1/inst/apps/PROD_dr/admin/log/09041433/adconfig.log

AutoConfig is configuring the Applications environment...

AutoConfig will consider the custom templates if present.
        Using CONFIG_HOME location     : /u01/application/fs1/inst/apps/PROD_dr
        Classpath                   : /u01/application/fs1/FMW_Home/Oracle_EBS-app1/shared-libs/ebs-appsborg/WEB-INF/lib/ebsAppsborgManifest.jar:/u01/application/fs1/EBSapps/comn/java/classes

        Using Context file          : /u01/application/fs1/inst/apps/PROD_dr/appl/admin/PROD_dr.xml

Context Value Management will now update the Context file

        Updating Context file...COMPLETED

        Attempting upload of Context file and templates to database...COMPLETED

Configuring templates from all of the product tops...
        Configuring AD_TOP........COMPLETED
        Configuring FND_TOP.......COMPLETED
        Configuring ICX_TOP.......COMPLETED
        Configuring MSC_TOP.......COMPLETED
        Configuring IEO_TOP.......COMPLETED
        Configuring BIS_TOP.......COMPLETED
        Configuring CZ_TOP........COMPLETED
        Configuring SHT_TOP.......COMPLETED
        Configuring AMS_TOP.......COMPLETED
        Configuring CCT_TOP.......COMPLETED
        Configuring WSH_TOP.......COMPLETED
        Configuring CLN_TOP.......COMPLETED
        Configuring OKE_TOP.......COMPLETED
        Configuring OKL_TOP.......COMPLETED
        Configuring OKS_TOP.......COMPLETED
        Configuring CSF_TOP.......COMPLETED
        Configuring IBY_TOP.......COMPLETED
        Configuring JTF_TOP.......COMPLETED
        Configuring MWA_TOP.......COMPLETED
        Configuring CN_TOP........COMPLETED
        Configuring CSI_TOP.......COMPLETED
        Configuring WIP_TOP.......COMPLETED
        Configuring CSE_TOP.......COMPLETED
        Configuring EAM_TOP.......COMPLETED
        Configuring GMF_TOP.......COMPLETED
        Configuring PON_TOP.......COMPLETED
        Configuring FTE_TOP.......COMPLETED
        Configuring ONT_TOP.......COMPLETED
        Configuring AR_TOP........COMPLETED
        Configuring AHL_TOP.......COMPLETED
        Configuring IES_TOP.......COMPLETED
        Configuring OZF_TOP.......COMPLETED
        Configuring CSD_TOP.......COMPLETED
        Configuring IGC_TOP.......COMPLETED

AutoConfig completed successfully.
[applmgr@dr scripts]$
On the patch file system change to $AD_TOP/bin/ and run the following command:
[applmgr@dr bin]$ perl adconfig.pl contextfile=/u01/application/fs2/inst/apps/PROD_dr/appl/admin/PROD_dr.xml -syncctx
Enter the APPS user password:

The log file for this session is located at: /u01/application/fs2/inst/apps/PROD_dr/admin/log/09041447/adconfig.log

Option specified      : Synchronize context file
Only context file synchronization will be performed

        Classpath                   : /u01/application/fs2/FMW_Home/Oracle_EBS-app1/shared-libs/ebs-appsborg/WEB-INF/lib/ebsAppsborgManifest.jar:/u01/application/fs2/EBSapps/comn/java/classes

        Using ContextFile     : /u01/application/fs2/inst/apps/PROD_dr/appl/admin/PROD_dr.xml

        Synchronizing the context file ......COMPLETED

AutoConfig completed successfully.
[applmgr@dr bin]$

Update the Host Name in the FND_CONCURRENT_REQUESTS and FND_CONC_REQ_OUTPUTS tables

In order to synchronize your concurrent manager log and out directories, you must change the host name in the fnd_concurrent_requests table to the standby server name:
SQL> update apps.fnd_concurrent_requests
set logfile_node_name ='DR',
outfile_node_name = 'DR'
where logfile_node_name ='RAC2'
and outfile_node_name ='RAC2';  2    3    4    5

638 rows updated.

SQL> commit;

Commit complete


:rsync the concurrent log and out files from old primary application server to new ones:

rsync -avz log applmgr@192.168.x.x:/u01/application/fs_ne/inst/PROD_dr/logs/appl/conc
rsync -avz out applmgr@192.168.x.x:/u01/application/fs_ne/inst/PROD_dr/logs/appl/conc

Now start the application services in the new primary servers run file system and redirect the user to the new url


http://dr.localdomain:8001/OA_HTML/AppsLocalLogin.jsp


Now we will do the switchback which will make primary to standby and standby to primary

a.Verify that the primary database at the standby site is open, and the standby database at the primary site is mounted.
b. Verify all the redo logs are transferred to standby and are applied.
c. On the primary site, check whether the switchover_status from v$database is showing: TO STANDBY


in primary
SQL> select switchover_status from v$database;

SWITCHOVER_STATUS
--------------------
TO STANDBY
On the primary database, issue the command:

SQL> alter database commit to switchover to physical standby;

Database altered.

So this has shut down my database.
[oracle@dr dbs]$ sqlplus / as sysdba

SQL*Plus: Release 12.1.0.2.0 Production on Wed Sep 5 04:38:42 2018

Copyright (c) 1982, 2014, Oracle.  All rights reserved.

Connected to an idle instance.

SQL> startup nomount;
ORA-32004: obsolete or deprecated parameter(s) specified for RDBMS instance
ORACLE instance started.

Total System Global Area 2147483648 bytes
Fixed Size                  2926472 bytes
Variable Size             503318648 bytes
Database Buffers         1627389952 bytes
Redo Buffers               13848576 bytes
SQL> alter database mount standby database;

Database altered.

SQL> alter system set LOG_ARCHIVE_DEST_STATE_2=defer scope=both sid='*';

System altered.

SQL>


in the standby
SQL> select switchover_status from v$database;

SWITCHOVER_STATUS
--------------------
TO PRIMARY

SQL> select database_role from v$database;

DATABASE_ROLE
----------------
PHYSICAL STANDBY


in the standby init file
changed the below parameters
*.log_archive_config='dg_config=(PROD,PRODDR)'
*.log_archive_dest_1='LOCATION=/u01/database/PROD/data'
*.log_archive_dest_2='service=PRODDR ASYNC valid_for=(ONLINE_LOGFILE,PRIMARY_ROLE) db_unique_name=PRODDR'
*.log_archive_dest_state_2='enable

now in the standby


SQL> alter database commit to switchover to primary with session shutdown;

Database altered.

SQL> exit;
Disconnected from Oracle Database 12c Enterprise Edition Release 12.1.0.2.0 - 64bit Production
With the Partitioning, OLAP, Advanced Analytics and Real Application Testing options
[oracle@rac2 dbs]$ sqlplus / as sysdba

SQL*Plus: Release 12.1.0.2.0 Production on Tue Sep 4 21:17:08 2018

Copyright (c) 1982, 2014, Oracle.  All rights reserved.


Connected to:
Oracle Database 12c Enterprise Edition Release 12.1.0.2.0 - 64bit Production
With the Partitioning, OLAP, Advanced Analytics and Real Application Testing options

SQL> select open_mode,database_role from v$database;

OPEN_MODE            DATABASE_ROLE
-------------------- ----------------
MOUNTED              PRIMARY


As the ORACLE user on both the primary and standby database servers, change the host name in the standby service definitions to point to the new standby server in both the <CONTEXT_NAME>_ifile.ora and <STNDBY_CONTEXT>_ifile.ora (which are located in the <TNS_ADMIN> directory(already done in the above sections, you can refer it to interchange the host names again)


now in the primary
[oracle@rac2 dbs]$ pwd
/u01/database/PROD/12.1.0/dbs
[oracle@rac2 dbs]$ sqlplus / as sysdba

SQL*Plus: Release 12.1.0.2.0 Production on Tue Sep 4 21:21:55 2018

Copyright (c) 1982, 2014, Oracle.  All rights reserved.

Connected to an idle instance.

SQL> startup mount pfile='/u01/database/PROD/12.1.0/dbs/initPROD.ora';
ORA-32006: SEC_CASE_SENSITIVE_LOGON initialization parameter has been deprecated
ORACLE instance started.

Total System Global Area 2147483648 bytes
Fixed Size                  2926472 bytes
Variable Size             452987000 bytes
Database Buffers         1677721600 bytes
Redo Buffers               13848576 bytes
Database mounted.
SQL> create spfile from pfile;

File created.

SQL> shut immediate;
ORA-01109: database not open


Database dismounted.
ORACLE instance shut down.
SQL> startup;
ORA-32004: obsolete or deprecated parameter(s) specified for RDBMS instance
ORACLE instance started.

Total System Global Area 2147483648 bytes
Fixed Size                  2926472 bytes
Variable Size             452987000 bytes
Database Buffers         1677721600 bytes
Redo Buffers               13848576 bytes
Database mounted.
Database opened.
SQL> select database_role,open_mode from v$database;

DATABASE_ROLE    OPEN_MODE
---------------- --------------------
PRIMARY          READ WRITE


in the stanbdy started the mrp process
[oracle@dr admin]$ sqlplus / as sysdba

SQL*Plus: Release 12.1.0.2.0 Production on Wed Sep 5 04:57:37 2018

Copyright (c) 1982, 2014, Oracle.  All rights reserved.


Connected to:
Oracle Database 12c Enterprise Edition Release 12.1.0.2.0 - 64bit Production
With the Partitioning, OLAP, Advanced Analytics and Real Application Testing options

SQL> alter database recover managed standby database disconnect from session;

Database altered.

Now verify if the archives are getting shipped or not
in the primary
SQL> alter system switch logfile;

System altered.

SQL> archive log list;
Database log mode              Archive Mode
Automatic archival             Enabled
Archive destination            /u01/database/PROD/data
Oldest online log sequence     128
Next log sequence to archive   129
Current log sequence           129
SQL>

in the stanbdy
SQL> SELECT 'Last Applied : ' Logs,
TO_CHAR(next_time,'DD-MON-YY:HH24:MI:SS') TIME,thread#,sequence#
FROM v$archived_log
WHERE sequence# =
(SELECT MAX(sequence#) FROM v$archived_log WHERE applied='YES'
)
UNION
SELECT 'Last Received : ' Logs,
TO_CHAR(next_time,'DD-MON-YY:HH24:MI:SS') TIME,thread#,sequence#
FROM v$archived_log
WHERE sequence# =(SELECT MAX(sequence#) FROM v$archived_log );    2    3    4    5    6    7    8    9   10   11

LOGS             TIME                  THREAD#  SEQUENCE#
---------------- ------------------ ---------- ----------
Last Applied :   04-SEP-18:21:29:46          1        128
Last Received :  04-SEP-18:21:29:46          1        128
Connect to the new primary database using SQL*Plus as the APPS user, and execute the following commands:

Copyright (c) 1982, 2014, Oracle.  All rights reserved.

Last Successful login time: Tue Sep 04 2018 16:03:42 -04:00

Connected to:
Oracle Database 12c Enterprise Edition Release 12.1.0.2.0 - 64bit Production
With the Partitioning, OLAP, Advanced Analytics and Real Application Testing options

SQL> exec fnd_net_services.remove_system ('PROD');

PL/SQL procedure successfully completed.

SQL> commit;

Commit complete.

SQL> exec fnd_conc_clone.setup_clean;

PL/SQL procedure successfully completed.

SQL> exec ad_zd_fixer.clear_valid_nodes_info;

PL/SQL procedure successfully completed.

SQL> commit;

Commit complete.

SQL>
run autoconfig
[oracle@rac2 PROD_rac2]$ sh adautocfg.sh
Enter the APPS user password:
The log file for this session is located at: /u01/database/PROD/12.1.0/appsutil/log/PROD_rac2/09042141/adconfig.log

AutoConfig is configuring the Database environment...

AutoConfig will consider the custom templates if present.
        Using ORACLE_HOME location : /u01/database/PROD/12.1.0
        Classpath                   : :/u01/database/PROD/12.1.0/jdbc/lib/ojdbc6.jar:/u01/database/PROD/12.1.0/appsutil/java/xmlparserv2.jar:/u01/database/PROD/12.1.0/appsutil/java:/u01/database/PROD/12.1.0/jlib/netcfg.jar:/u01/database/PROD/12.1.0/jlib/ldapjclnt12.jar

        Using Context file          : /u01/database/PROD/12.1.0/appsutil/PROD_rac2.xml

Context Value Management will now update the Context file

        Updating Context file...COMPLETED

        Attempting upload of Context file and templates to database...COMPLETED

Updating rdbms version in Context file to db121
Updating rdbms type in Context file to 64 bits
Configuring templates from ORACLE_HOME ...

AutoConfig completed successfully.
[oracle@rac2 PROD_rac2]$

in the primary server and standby server
start stop listener
[oracle@rac2 PROD_rac2]$ lsnrctl stop PROD

LSNRCTL for Linux: Version 12.1.0.2.0 - Production on 04-SEP-2018 21:42:42

Copyright (c) 1991, 2014, Oracle.  All rights reserved.

Connecting to (DESCRIPTION=(ADDRESS=(PROTOCOL=TCP)(HOST=rac2.localdomain)(PORT=1521)))
The command completed successfully
[oracle@rac2 PROD_rac2]$ lsnrctl start PROD

LSNRCTL for Linux: Version 12.1.0.2.0 - Production on 04-SEP-2018 21:42:46

Copyright (c) 1991, 2014, Oracle.  All rights reserved.

Starting /u01/database/PROD/12.1.0/bin/tnslsnr: please wait...

TNSLSNR for Linux: Version 12.1.0.2.0 - Production
System parameter file is /u01/database/PROD/12.1.0/network/admin/PROD_rac2/listener.ora
Log messages written to /u01/database/PROD/12.1.0/admin/PROD_rac2/diag/tnslsnr/rac2/prod/alert/log.xml
Listening on: (DESCRIPTION=(ADDRESS=(PROTOCOL=tcp)(HOST=rac2.localdomain)(PORT=1521)))

Connecting to (DESCRIPTION=(ADDRESS=(PROTOCOL=TCP)(HOST=rac2.localdomain)(PORT=1521)))
STATUS of the LISTENER
------------------------
Alias                     PROD
Version                   TNSLSNR for Linux: Version 12.1.0.2.0 - Production
Start Date                04-SEP-2018 21:42:46
Uptime                    0 days 0 hr. 0 min. 0 sec
Trace Level               off
Security                  ON: Local OS Authentication
SNMP                      OFF
Listener Parameter File   /u01/database/PROD/12.1.0/network/admin/PROD_rac2/listener.ora
Listener Log File         /u01/database/PROD/12.1.0/admin/PROD_rac2/diag/tnslsnr/rac2/prod/alert/log.xml
Listening Endpoints Summary...
  (DESCRIPTION=(ADDRESS=(PROTOCOL=tcp)(HOST=rac2.localdomain)(PORT=1521)))
Services Summary...
Service "PROD" has 1 instance(s).
  Instance "PROD", status UNKNOWN, has 1 handler(s) for this service...
The command completed successfully
[oracle@rac2 PROD_rac2]$
in standby
[oracle@dr admin]$ lsnrctl stop PROD

LSNRCTL for Linux: Version 12.1.0.2.0 - Production on 05-SEP-2018 05:15:33

Copyright (c) 1991, 2014, Oracle.  All rights reserved.

Connecting to (DESCRIPTION=(ADDRESS=(PROTOCOL=TCP)(HOST=dr.localdomain)(PORT=1521)))
The command completed successfully
[oracle@dr admin]$ lsnrctl start PROD

LSNRCTL for Linux: Version 12.1.0.2.0 - Production on 05-SEP-2018 05:15:38

Copyright (c) 1991, 2014, Oracle.  All rights reserved.

Starting /u01/database/oracledb/product/12c/db_1/bin/tnslsnr: please wait...

TNSLSNR for Linux: Version 12.1.0.2.0 - Production
System parameter file is /u01/database/oracledb/product/12c/db_1/network/admin/listener.ora
Log messages written to /u01/database/oracledb/product/12c/db_1/admin/PROD_dr/diag/tnslsnr/dr/prod/alert/log.xml
Listening on: (DESCRIPTION=(ADDRESS=(PROTOCOL=tcp)(HOST=dr.localdomain)(PORT=1521)))

Connecting to (DESCRIPTION=(ADDRESS=(PROTOCOL=TCP)(HOST=dr.localdomain)(PORT=1521)))
STATUS of the LISTENER
------------------------
Alias                     PROD
Version                   TNSLSNR for Linux: Version 12.1.0.2.0 - Production
Start Date                05-SEP-2018 05:15:38
Uptime                    0 days 0 hr. 0 min. 0 sec
Trace Level               off
Security                  ON: Local OS Authentication
SNMP                      OFF
Listener Parameter File   /u01/database/oracledb/product/12c/db_1/network/admin/listener.ora
Listener Log File         /u01/database/oracledb/product/12c/db_1/admin/PROD_dr/diag/tnslsnr/dr/prod/alert/log.xml
Listening Endpoints Summary...
  (DESCRIPTION=(ADDRESS=(PROTOCOL=tcp)(HOST=dr.localdomain)(PORT=1521)))
Services Summary...
Service "PROD" has 1 instance(s).
  Instance "PROD", status UNKNOWN, has 1 handler(s) for this service...
The command completed successfully
[oracle@dr admin]$


Configure the Application Tier After Role Transition switchback

in the run file system, run autoconfig
[applmgr@rac2 scripts]$ sh adautocfg.sh
Enter the APPS user password:

The log file for this session is located at: /u01/application/PROD/fs1/inst/apps/PROD_rac2/admin/log/09042147/adconfig.log

AutoConfig is configuring the Applications environment...

AutoConfig will consider the custom templates if present.
        Using CONFIG_HOME location     : /u01/application/PROD/fs1/inst/apps/PROD_rac2
        Classpath                   : /u01/application/PROD/fs1/FMW_Home/Oracle_EBS-app1/shared-libs/ebs-appsborg/WEB-INF/lib/ebsAppsborgManifest.jar:/u01/application/PROD/fs1/EBSapps/comn/java/classes

        Using Context file          : /u01/application/PROD/fs1/inst/apps/PROD_rac2/appl/admin/PROD_rac2.xml

Context Value Management will now update the Context file

        Updating Context file...COMPLETED

        Attempting upload of Context file and templates to database...COMPLETED

Configuring templates from all of the product tops...
        Configuring AD_TOP........COMPLETED
        Configuring FND_TOP.......COMPLETED
        Configuring ICX_TOP.......COMPLETED
        Configuring MSC_TOP.......COMPLETED
        Configuring IEO_TOP.......COMPLETED
        Configuring BIS_TOP.......COMPLETED
        Configuring CZ_TOP........COMPLETED
        Configuring SHT_TOP.......COMPLETED
        Configuring AMS_TOP.......COMPLETED
        Configuring CCT_TOP.......COMPLETED
        Configuring WSH_TOP.......COMPLETED
        Configuring CLN_TOP.......COMPLETED
        Configuring OKE_TOP.......COMPLETED
        Configuring OKL_TOP.......COMPLETED
        Configuring OKS_TOP.......COMPLETED
        Configuring CSF_TOP.......COMPLETED
        Configuring IBY_TOP.......COMPLETED
        Configuring JTF_TOP.......COMPLETED
        Configuring MWA_TOP.......COMPLETED
        Configuring CN_TOP........COMPLETED
        Configuring CSI_TOP.......COMPLETED
        Configuring WIP_TOP.......COMPLETED
        Configuring CSE_TOP.......COMPLETED
        Configuring EAM_TOP.......COMPLETED
        Configuring GMF_TOP.......COMPLETED
        Configuring PON_TOP.......COMPLETED
        Configuring FTE_TOP.......COMPLETED
        Configuring ONT_TOP.......COMPLETED
        Configuring AR_TOP........COMPLETED
        Configuring AHL_TOP.......COMPLETED
        Configuring IES_TOP.......COMPLETED
        Configuring OZF_TOP.......COMPLETED
        Configuring CSD_TOP.......COMPLETED
        Configuring IGC_TOP.......COMPLETED

AutoConfig completed successfully.
in the patch file system
[applmgr@rac2 PROD]$ cd $AD_TOP/bin
[applmgr@rac2 bin]$ echo $CONTEXT_FILE
/u01/application/PROD/fs2/inst/apps/PROD_rac2/appl/admin/PROD_rac2.xml
[applmgr@rac2 bin]$ perl adconfig.pl contextfile=/u01/application/PROD/fs2/inst/apps/PROD_rac2/appl/admin/PROD_rac2.xml -syncctx


Update the host names for concurrent requests log and out files to point to new primary after switchback

update apps.fnd_concurrent_requests set logfile_node_name ='RAC2',outfile_node_name ='RAC2' where logfile_node_name ='DR' and outfile_node_name ='DR';

645 rows updated.

SQL> commit;

Commit complete.


rsync the concurrent log and out files between primary and secondary

rsync -avz log applmgr@192.168.x.x:/u01/application/fs_ne/inst/PROD_dr/logs/appl/conc

rsync -avz out applmgr@192.168.x.x:/u01/application/fs_ne/inst/PROD_dr/logs/appl/conc

start the application services and redirect the user to new url

http://rac2.localdomain:8000/OA_HTML/AppsLocalLogin.jsp


Once you get comfortable with switchover/Switchback process, then failover steps can also be easily done. At this moment, failover is out of scope for this post.


Hope this post will help someone. Happy learning..:)